ዜና

The Ultimate Expert Guide: 15+ Head Tattoos for Black Men
Welcome to INKSOUL, your complete tattoo solution. We are committed to empowering tattoo artists with reliable, high-performance supplies, and serving retail and wholesale customers worldwide. The scalp is undeniably one of the most prominent, boldest, and most unapologetic canvases a person can offer to a tattoo artist. Over the past decade, the cultural shift toward embracing visible body art has brought head tattoos into the mainstream. However, executing head tattoos for black men requires specialized knowledge of melanin-rich skin, scalp anatomy, and the right combination of high-grade equipment.
From our experience supplying modern tattoo studios, we know that darker skin tones require masterful contrast, flawless stencil application, and precision ink packing to ensure the artwork remains readable and vibrant for a lifetime. In this authoritative guide, we will explore 15+ head tattoos for black men, discussing the aesthetic appeal of each design, the technical execution required, and how INKSOUL's complete product range can help artists achieve perfection on this challenging canvas.
Table of Contents
Understanding the Canvas: Melanin and the Scalp
15+ Striking Ideas for Head Tattoos for Black Men
Geometric and Mandala Patterns
Tribal and Cultural Heritage
Script and Lettering
Nature and Realism Concepts
Mastering the Execution with Professional Equipment
Pain Management and Scalp Aftercare
Summary Table: Design Choices and Equipment
Frequently Asked Questions
Industry References
Understanding the Canvas: Melanin and the Scalp
Designing and executing head tattoos for black men requires a distinct technical approach. The scalp is heavily vascularized, meaning it tends to bleed more than other areas, which can dilute ink and obscure the artist's view. Furthermore, melanin acts as a natural filter over the tattoo ink. Because the ink resides in the dermis, the epidermis (containing the melanin) sits above it like a tinted window.
We recommend prioritizing bold blackwork, stark negative space, and heavy line weights. Fine-line, highly detailed micro-tattoos often blur or lose their readability over time on highly melanated, sun-exposed scalp skin. Contrast is your greatest asset. By utilizing high-quality ink and optimizing needle depth, artists can create head tattoos for black men that age beautifully.
15+ Striking Ideas for Head Tattoos for Black Men
If you are an artist seeking inspiration or a client ready for a bold transformation, here are 15+ impactful concepts for head tattoos for black men, categorized by style.
Geometric and Mandala Patterns
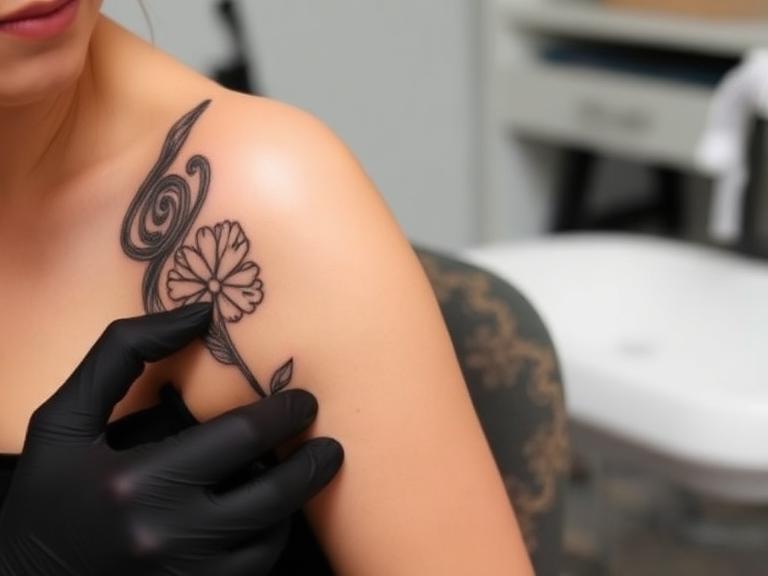
1. The Crown Chakra Mandala: Placed directly on the top of the head, a sprawling mandala utilizes heavy geometric lines and expansive negative space. The symmetry works perfectly with the natural curvature of the skull.
2. Sacred Geometry Wraps: Utilizing shapes like the Flower of Life or Metatron's Cube, these designs can wrap from the back of the head down to the nape of the neck, offering a highly structured aesthetic.
3. Hexagonal Hive Patterns: An abstract, futuristic approach where hexagonal grids fade out toward the hairline. We recommend using varied line weights to create depth.
4. Geometric Dotwork Fade: For clients who keep a shaved head, dotwork (stippling) that creates a gradient effect from solid black at the crown fading down to the ears is incredibly striking.
Tribal and Cultural Heritage
5. Neo-Polynesian Side Wrap: Thick, bold black tribal patterns swooping over the ear and across the parietal ridge. This style is exceptional for head tattoos for black men because the solid black packing contrasts brilliantly with darker skin.
6. Traditional African Adinkra Symbols: Stamping powerful symbols of strength, wisdom, or endurance around the back of the head. These symbols rely on thick, legible line work.
7. Egyptian Hieroglyphics: A vertical strip of hieroglyphics running down the center back of the head. It provides a regal, historical connection that commands attention.
8. Aztec Block Patterns: Utilizing sharp, right-angled tribal motifs that frame the temporal region, creating a chiseled, warrior-like profile.
Script and Lettering
9. Old English Gothic Script: Heavy, blackletter fonts spanning the side of the head. This is one of the most popular head tattoos for black men due to its raw, unapologetic street-style aesthetic.
10. Hairline Mantra: A clean, cursive script following the natural curvature of the front hairline or resting just above the ear. We recommend thick cursive rather than thin, wispy script to ensure longevity.
11. Bold Roman Numerals: Commemorating an important birth year or anniversary, placed horizontally across the occipital bone at the back of the skull.
12. Chicano-Style Lettering: Highly stylized, flowing script with heavy shading, often wrapping around the side and back of the head for a continuous read.
Nature and Realism Concepts
13. The Lion's Profile: A high-contrast, black-and-grey silhouette of a lion placed on the side of the head. Using skin breaks (negative space) for the highlights rather than white ink ensures the piece remains bold.
14. Wrapping Botanical Leaves: Laurel wreaths or olive branches that curve gracefully around the ear and down the neck, providing an elegant, timeless framing of the face.
15. The Compass Rose: A highly detailed compass placed on the back of the head, symbolizing direction and focus. This requires exceptional stencil placement to ensure perfect symmetry.
16. Panther or Predator Silhouettes: Utilizing solid blackwork to create the shape of a panther or eagle in flight, stretching across the scalp. The solid black ink packing is highly effective on melanin-rich skin.
Mastering the Execution with Professional Equipment
To execute perfect head tattoos for black men, an artist must rely on flawless equipment. The scalp is a highly contoured, unforgiving surface. At INKSOUL, we supply everything a modern tattoo studio needs to overcome these technical hurdles.
Precision Stenciling for Curved Surfaces
Applying a stencil to a spherical surface without warping the design is notoriously difficult. We recommend utilizing our advanced Tattoo Transfer Printers. Reliable thermal and wireless printers, such as the INKSOUL T08FS, Phomemo TP31, or XIRU XR3, ensure crisp stencil transfers directly from your iPad to the paper. When paired with our high-contrast, smudge-resistant Tattoo Stencil Paper, artists can lay down a stencil that will withstand the heavy wiping required during a bleeding scalp session.
Optimized Machines and Needles
Scalp skin is thin, and the skull bone lies immediately beneath it. Pushing the needle too deep will cause immediate blowouts, turning crisp lines into blurry blobs. To prevent this, artists need reliable Tattoo Machines. We offer high-performance rotary and coil machines for every style. For head tattoos for black men, a smooth-running rotary machine reduces vibration, allowing for delicate depth control over the skull.
Pair these machines with our premium Tattoo Needles. We provide a full selection of round liners, round shaders, magnums, curved magnums, and cartridges. We recommend using larger round liners (like a 9RL or 11RL) for the bold outlines required on darker skin, and curved magnums to smoothly pack solid black tribal areas without chewing up the delicate scalp tissue.
Studio Visibility and Ergonomics
The scalp naturally reflects light, creating glare that can blind an artist. To combat this, you need our Tattoo Lighting Supply. We offer adjustable, flicker-free LED lights tailored for studio visibility and color accuracy, allowing you to see exactly how the black ink is settling into the dermis.
Finally, a head tattoo often requires the artist to contort into uncomfortable positions. Explore our Tattoo Toys & Accessories for workspace upgrades, ergonomic grips, responsive foot pedals, and stable power supplies that ensure you remain comfortable and focused during long scalp sessions.
From our experience, the key to vibrant head tattoos for black men is packing the ink cleanly on the first pass. Overworking the scalp causes excessive swelling, which rejects the ink. Use high-quality INKSOUL magnum cartridges to saturate the skin efficiently and minimize trauma.
Pain Management and Scalp Aftercare
It is no secret that head tattoos are painful. The lack of subcutaneous fat means the vibration of the tattoo machine resonates directly against the skull. We recommend advising clients to ensure they are well-rested and hydrated before the session.
Aftercare for head tattoos for black men is equally critical. The scalp is constantly exposed to the sun, which accelerates fading. Clients must commit to wearing SPF 50 sunscreen or a hat whenever outdoors. Because scalp hair grows back quickly, clients who prefer a bald look must be careful when shaving over a fresh tattoo. Instruct them to use a gentle, fragrance-free lotion and avoid razor blades until the skin is entirely healed (typically 3 to 4 weeks) to prevent slicing the healing epidermis and pulling out ink.
Summary Table: Design Choices and Equipment
Design Style
Key Aesthetic Focus
Recommended INKSOUL Equipment
Gothic Script / Lettering
Thick, bold blackletter fonts with sharp edges.
INKSOUL 11RL Needles, High-performance Rotary Machines.
Tribal and Cultural Motifs
Solid black packing, heavy contrast.
Curved Magnums, Smudge-resistant Tattoo Stencil Paper.
Geometric and Mandalas
Perfect symmetry and precise line weights.
INKSOUL T08FS / Phomemo TP31 Thermal Printers.
Nature and Realism
Smooth gradients and negative space highlights.
Round Shaders, Adjustable LED Tattoo Lighting Supply.
Frequently Asked Questions
Do head tattoos for black men fade faster than on other body parts?
Yes, head tattoos generally fade faster due to high cellular turnover on the scalp, constant sun exposure, and daily washing/shaving. Utilizing bold designs and ensuring your artist uses top-tier equipment like INKSOUL Tattoo Machines will help the tattoo hold its integrity significantly longer.
Will my hair grow back over the tattoo?
Absolutely. Tattooing does not destroy the hair follicle because the ink is deposited into the dermis, while the root of the hair follicle sits deeper. If you decide to grow your hair out, it will completely cover or obscure the tattoo, depending on hair density.
What colors work best for head tattoos for black men?
From our experience, heavily saturated black ink is always the best choice for highly melanated skin. It provides the necessary contrast to stand out clearly. Dark reds and deep blues can work as accents, but solid blackwork remains the industry gold standard for longevity and readability.
How do I prevent blowouts on the scalp?
Blowouts occur when the needle penetrates the hypodermis layer, causing ink to spread laterally. Artists must use highly responsive Tattoo Machines and adjust their needle depth to be extremely shallow. We recommend using INKSOUL cartridge needles for ultimate stability and depth control.
Industry References
Alliance of Professional Tattooists - Skin Anatomy and Ink Placement Guidelines
American Academy of Dermatology - Caring for Tattooed Skin and Sun Protection
OSHA Bloodborne Pathogens Standard for Tattoo Studios

The Mechanics of Ink: Coil Tattoo Machine How It Works
Welcome to INKSOUL, your complete tattoo solution. We are committed to empowering tattoo artists with reliable, high-performance supplies. Serving retail and wholesale customers worldwide, INKSOUL supplies everything a modern tattoo studio needs. One of the most fundamental aspects of mastering the craft of tattooing is understanding the equipment in your hand. The iconic buzzing sound of a traditional machine is synonymous with the industry, but to truly excel, an artist must understand the physics and mechanics behind that sound. When apprentices begin their journey, the first major technical question they ask is about the coil tattoo machine how it works.
From our experience, an artist who fully understands the electromagnetic principles of their equipment can troubleshoot issues on the fly, tune their machine for specific skin types, and cause significantly less trauma to the client's skin. In this comprehensive technical guide, we will break down the anatomy of the device, explain the precise step-by-step circuit, and provide expert insights into optimizing your studio setup for peak performance.
Table of Contents
The Anatomy of a Coil Machine
Step-by-Step: Coil Tattoo Machine How It Works
Tuning Mechanics: Liners vs. Shaders
Integrating Your Machine with INKSOUL Supplies
Summary Table: Component Functions
Frequently Asked Questions (FAQs)
Industry References
The Anatomy of a Coil Machine
To understand a coil tattoo machine how it works, you must first become familiar with its individual components. A coil machine is essentially an interrupted electromagnetic circuit. Every single piece of hardware on the frame plays a critical role in conducting electricity, generating a magnetic field, or providing mechanical resistance.
The Frame
The frame is the foundation of the machine. It holds all the components together and serves as the ground for the electrical circuit. We recommend frames made from conductive, magnetic materials such as iron or low-carbon steel, as they help amplify the magnetic field generated by the coils. While brass and aluminum frames are lighter and reduce hand fatigue, they do not conduct magnetism, requiring specialized yokes to bridge the magnetic field.
The Coils (Electromagnets)
The coils are the beating heart of the device. They consist of a core (usually iron) wrapped tightly in insulated copper wire. When you ask about a coil tattoo machine how it works, the answer lies in these wraps of wire. When direct current (DC) passes through the copper wire, the iron core becomes highly magnetized. You will typically see coils designated by their number of wraps, such as 8-wrap, 10-wrap, or 12-wrap. Fewer wraps mean less magnetic pull but a faster machine (ideal for lining), while more wraps create a stronger, slower magnetic pull (ideal for shading and color packing).
The Armature Bar and Springs
The armature bar is the heavy piece of steel positioned directly above the coils. Attached to the rear of the frame is the rear spring, which holds the armature bar in place and provides the upward tension. Attached to the top of the armature bar is the front spring. The balance between the tension of these two springs dictates the stroke length and the hitting force of the needles.
The Contact Screw
The contact screw is an adjustable conductive screw (often made of silver, copper, or brass) that rests against the tip of the front spring. This is the exact point where the electrical circuit is completed and subsequently broken during operation. Adjusting the distance between the contact screw and the front spring is the primary method of tuning the machine's speed and stroke.
Step-by-Step: Coil Tattoo Machine How It Works
The physical motion of the needle moving up and down to puncture the skin is the result of a rapidly opening and closing electrical circuit. To fully answer the question of a coil tattoo machine how it works, we must follow the path of the electrical current.
Phase 1: Completing the Circuit
When you press your foot pedal, electricity travels from your power supply, up your clip cord, and into the rear binding post of the machine. The electricity flows through the frame, into the contact screw, and down into the front spring. From the front spring, it travels into the coils and finally out through the ground. Because the contact screw is physically touching the front spring, the circuit is closed, allowing current to flow freely.
Phase 2: The Electromagnetic Pull
As the current flows through the tightly wrapped copper wire of the coils, it generates a powerful electromagnetic field. This magnetic field instantly attracts the steel armature bar, pulling it forcefully downward toward the coils. Because the tattoo needle is attached to a nipple on the armature bar, this downward motion drives the needle out of the tube and into the client's skin.
Phase 3: Breaking the Circuit
Here is the genius of a coil tattoo machine how it works: as the armature bar is pulled downward by the magnets, it pulls the front spring away from the contact screw. The exact moment the front spring separates from the contact screw, the electrical circuit is broken. Without electricity, the coils instantly lose their magnetic field.
Phase 4: The Recovery Stroke
With the magnetic field gone, there is nothing pulling the armature bar downward. The natural tension of the rear spring violently snaps the armature bar back upward to its resting position. As it moves upward, it pulls the needle out of the skin, and the front spring crashes back into the contact screw. The circuit is now closed again, electricity flows into the coils, and the entire process repeats.
This opening and closing of the circuit happens incredibly fast, typically between 50 and 150 times per second (measured in Hertz). This rapid, cyclic motion is exactly a coil tattoo machine how it works, creating the consistent needle depth required for solid linework and smooth shading.
From our experience, the most common point of failure for beginners is a dirty contact point. Every time the circuit breaks, a microscopic electrical arc (spark) occurs between the contact screw and the front spring. Over time, this creates carbon buildup. We recommend regularly cleaning your front spring and contact screw with a lightly abrasive pad to maintain a crisp, consistent electrical connection.
Tuning Mechanics: Liners vs. Shaders
Understanding a coil tattoo machine how it works allows an artist to manipulate the physics of the machine for different tasks. A machine set up for outlining a piece requires vastly different mechanics than a machine set up for packing solid black ink or creating soft grey wash gradients.
Tuning a Liner
A liner needs to run fast and hit hard to inject ink quickly in a single pass without snagging the skin. Liners typically utilize 8-wrap coils, which generate a faster, slightly weaker magnetic pull. The rear spring is usually shorter and stiffer, causing the armature bar to snap back faster. Furthermore, the gap between the contact screw and the front spring (when the armature bar is held down) is tuned to be very narrow—often referred to as a "dime gap" (roughly the thickness of a US dime). This short gap creates a short stroke, resulting in rapid needle punctures.
Tuning a Shader
A shader needs to run slower and have a longer stroke to allow the thicker groupings of needles (like magnums) to penetrate the skin smoothly and deposit larger amounts of ink. Shaders typically utilize 10-wrap or 12-wrap coils for a heavier, stronger magnetic pull. The springs are longer and softer, allowing for a more forgiving hit that causes less trauma to the skin during color packing. The contact gap is wider—often referred to as a "nickel gap"—creating a longer stroke and more dwell time in the skin.
Integrating Your Machine with INKSOUL Supplies
Grasping a coil tattoo machine how it works is only the first step. To execute professional-grade artwork, your machine must be paired with high-performance supplies. Beyond needles and pens, INKSOUL provides a one-stop inventory for tattoo studios. Each product is chosen for quality, compliance, and performance.
Once your coil machine is perfectly tuned, you must select the appropriate Tattoo Needles. We offer a full selection of round liners for crisp outlines, as well as round shaders, magnums, and curved magnums for flawless color blending. A well-tuned machine requires perfectly soldered needles to prevent ink spitting and skin snagging.
Before the needle ever touches the skin, the foundation of your tattoo relies on a perfect stencil. We recommend our high-performance Tattoo Transfer Printers. Our reliable thermal and wireless printers, including the INKSOUL T08FS, Phomemo TP31, and XIRU XR3, ensure crisp stencil transfers. When paired with our high-contrast, smudge-resistant Tattoo Stencil Paper, you guarantee that your design will hold up through hours of wiping and shading.
Furthermore, a fast-running coil machine requires an immaculate visual environment. Our Tattoo Lighting Supply features adjustable, flicker-free LED lights tailored for studio visibility and absolute color accuracy, ensuring you can see the exact depth of your needle. Finally, to keep your machine running smoothly, explore our Tattoo Toys & Accessories, which include ergonomic workspace upgrades, vibration-absorbing grips, responsive foot pedals, and stable power supplies.
Summary Table: Component Functions
Machine Component
Primary Function in the Electromagnetic Circuit
Effect on Machine Tuning
Copper Coils
Generates the magnetic field when electricity is applied.
More wraps (10-12) equal a slower, stronger pull for shading. Fewer wraps (8) equal a faster pull for lining.
Armature Bar
Carries the needle and responds to the magnetic pull of the coils.
Heavier bars slow the machine down and hit harder. Lighter bars speed the machine up.
Rear Spring
Provides the upward tension to pull the armature bar away from the coils.
Stiffer springs create a faster, harder hit. Softer springs create a smoother, slower stroke.
Contact Screw
Completes the electrical circuit when touching the front spring.
Adjusting the angle and gap dictates the stroke length and duty cycle of the machine.
Frequently Asked Questions (FAQs)
What voltage should I run my coil tattoo machine at?
Because you now understand a coil tattoo machine how it works, you know that voltage dictates the electrical current entering the coils. There is no universal voltage. Liners generally run higher (between 7.5v and 9v) to maintain speed, while shaders run lower (between 6v and 8v) to allow for a softer hit. From our experience, you should tune by sound and feel, turning the voltage up just until the machine runs smoothly without stuttering or sounding excessively harsh.
Why is my coil machine getting hot?
Heat is a byproduct of electrical resistance. If your machine is running hot, your contact screw may be set too tight, forcing the coils to work too hard to pull the armature bar down. Alternatively, your power supply may be outputting dirty power, or you may have a short in your coils. We recommend inspecting your contact points and ensuring you are using a high-quality power supply from our Tattoo Toys & Accessories line.
Can a coil machine be used for both lining and shading?
While some artists use a "cutback" or hybrid machine tuned somewhere in the middle, it is generally not recommended. The physics of a coil tattoo machine how it works dictate that a machine is either optimized for a fast, short stroke (lining) or a slow, long stroke (shading). Attempting to use a liner as a shader will overwork the skin and cause excessive trauma.
How often should I change my machine's springs?
Springs are under constant mechanical stress, bending over 100 times per second. Over time, the steel suffers from metal fatigue and loses its tension, resulting in a sluggish machine. We recommend replacing your front and rear springs every 6 to 12 months, depending on how heavily you tattoo.
Industry References
Association of Professional Piercers and Tattoo Health Safety Standards
OSHA Bloodborne Pathogens Standard for Tattoo Studios
CDC Guidelines for Studio Hygiene and Equipment Maintenance
The 7 Difference Between a Tattoo and a Cosmetic Tattoo
As the body modification and beauty industries continue to merge and evolve, professionals and clients alike frequently encounter overlapping terminology. One of the most common inquiries we receive from emerging studio owners and clients is regarding the technical, procedural, and material distinctions across different skin pigmentation disciplines. Specifically, what is the exact difference between a tattoo and a cosmetic tattoo? While both practices involve depositing color into the skin using specialized needles, the similarities largely end there.
Authored by INKSOUL Tattoo Supply — Your Complete Tattoo Solution. Welcome to INKSOUL. We are committed to empowering tattoo artists with reliable, high-performance supplies. Serving retail and wholesale customers worldwide, INKSOUL supplies everything a modern tattoo studio needs — from precision needles to advanced stencil printers and studio lighting.
From our experience supplying premier studios around the globe, understanding the difference between a tattoo and a cosmetic tattoo is critical for selecting the correct equipment, managing client expectations, and ensuring optimal healed results. Traditional body art is designed to be a permanent, bold statement of artistic expression. Conversely, cosmetic tattooing—often referred to as permanent makeup (PMU) or micropigmentation—is engineered to be a subtle, semi-permanent enhancement of natural facial features or a reconstructive procedure. In this comprehensive industry guide, we will break down the structural skin science, the specific machinery required, the chemical composition of the inks, and the studio setup necessary to excel in either discipline.
Table of Contents
1. Purpose and Intent: Artistic Expression vs. Enhancement
2. Skin Anatomy and Penetration Depth
3. Equipment Variations: Tattoo Machines and Needles
4. Chemical Breakdown: Ink vs. Pigment Longevity
5. Studio Setup, Stencils, and Preparation
6. Summary Table: The Difference Between a Tattoo and a Cosmetic Tattoo
7. Frequently Asked Questions (FAQs)
8. Industry References
1. Purpose and Intent: Artistic Expression vs. Enhancement
To fully grasp the difference between a tattoo and a cosmetic tattoo, we must first examine the foundational intent behind each procedure. Traditional tattooing is an ancient art form focused on storytelling, identity, and bold visual aesthetics. Artists use the human body as a canvas to create complex designs, ranging from intricate black-and-grey realism to vibrant American traditional pieces. The goal is absolute permanence and maximum visibility.
A cosmetic tattoo serves a completely different functional purpose. It is primarily utilized to mimic the appearance of conventional makeup—such as microbladed eyebrows, lip blushing, and permanent eyeliner. Furthermore, cosmetic tattooing plays a massive role in paramedical reconstruction, including areola restoration following mastectomy procedures, scar camouflage, and scalp micropigmentation for hair loss. We recommend that professionals treating cosmetic clients approach the procedure with a mindset of subtle enhancement rather than bold artistic deviation, as facial symmetry and natural color matching are the ultimate markers of success in this field.
2. Skin Anatomy and Penetration Depth
The most significant anatomical difference between a tattoo and a cosmetic tattoo lies in the depth of pigment implantation. The human skin consists of three primary layers: the epidermis (the outermost layer), the dermis (the middle layer), and the hypodermis (subcutaneous tissue). The epidermis continuously sheds and regenerates its cells over a 28-day cycle.
In traditional tattooing, the artist utilizes robust machines to drive the needles deep into the reticular layer of the dermis. Because the cells in the deep dermis are highly stable, the ink becomes permanently trapped by macrophages (white blood cells), ensuring the design lasts a lifetime with minimal fading. If an artist does not reach this depth, the tattoo will fall out during the healing process.
Conversely, the technique used for a cosmetic tattoo requires the technician to deposit the pigment much shallower, specifically into the upper papillary layer of the dermis, just below the epidermal-dermal junction. By placing the pigment in this upper layer, the body's natural cellular turnover and metabolic processes will gradually break down the color over 1 to 3 years. This semi-permanence is highly desirable; as facial features sag and change with age, and as makeup trends shift, the client is not permanently locked into an outdated eyebrow arch or lip color.
3. Equipment Variations: Tattoo Machines and Needles
The mechanical tools utilized by artists highlight another major difference between a tattoo and a cosmetic tattoo. At INKSOUL, our complete product range ensures that beyond needles and pens, we provide a one-stop inventory for tattoo studios. Each product is carefully chosen for quality, compliance, and performance.
Traditional body art requires substantial power to push large needle groupings through thick areas of skin. For this, artists rely on specialized Tattoo Machines. We supply high-performance rotary and coil machines for every style — lining, shading, and color work. Coil machines utilize electromagnetic currents to drive the armature bar with heavy, punchy strikes, ideal for pushing bold, permanent lines. Traditional rotary machines offer smooth, continuous power for packing heavy color saturation.
In contrast, a cosmetic tattoo is performed on extremely delicate skin, such as the eyelids or lips. Using a heavy traditional coil machine on the face would cause severe tissue trauma and scarring. Cosmetic technicians utilize specialized, low-voltage rotary pens that offer a softer hit and a much shorter needle stroke. Additionally, microblading (a form of cosmetic tattooing) does not use a machine at all, but rather a manual hand tool fitted with a row of fine needles to slice superficial hair strokes into the brow.
The needle configurations also vary drastically. When examining Tattoo Needles, traditional artists require a full selection: round liners, round shaders, magnums, curved magnums and cartridges. A traditional artist might use a 15-magnum needle to shade a large back piece. Cosmetic tattoo artists almost exclusively use ultra-fine nano needles, single liners, or very small round shaders (such as 3RLs) to achieve microscopic precision mimicking natural hair follicles or soft lip blushing gradients.
4. Chemical Breakdown: Ink vs. Pigment Longevity
When clients ask about the difference between a tattoo and a cosmetic tattoo, the conversation inevitably turns to fading. Why does a bicep tattoo last fifty years, while microbladed eyebrows fade in two? The answer lies in the formulation of the liquid utilized.
Traditional tattoo ink is manufactured using small-molecule, highly concentrated carbon or metal-based pigments suspended in a carrier solution (such as alcohol, witch hazel, or glycerin). Because the particle size is incredibly small and dense, the body's immune system cannot easily break them down and carry them away. This ensures the heavy saturation required for traditional body art remains vibrant permanently.
Cosmetic tattoo pigments are formulated entirely differently. They utilize larger-molecule, iron-oxide or organic-based pigments with a much lower color density. These formulas are specifically engineered to be metabolized and safely absorbed by the body over a period of 12 to 36 months. We recommend that cosmetic artists educate their clients on this process, as annual touch-ups or "color boosts" are a mandatory part of maintaining a cosmetic tattoo, whereas traditional tattoos only require touch-ups if the initial healing process was compromised.
5. Studio Setup, Stencils, and Preparation
The operational workflow and studio environment also reflect the difference between a tattoo and a cosmetic tattoo. Both disciplines require absolute sterility, utilizing hospital-grade disinfectants, barrier films, and single-use disposable items. However, the preparation of the design differs greatly.
Traditional tattoo artists rely heavily on transferring complex designs from digital tablets onto the client's skin. To facilitate this, we provide advanced Tattoo Transfer Printers—including reliable thermal and wireless printers for crisp stencil transfers like the INKSOUL T08FS, Phomemo TP31, and XIRU XR3. These printers are paired with premium Tattoo Stencil Paper, delivering high-contrast, smudge-resistant transfer paper compatible with thermal and ink-based systems. A traditional artist will apply the stencil, wait for it to dry, and use it as an exact blueprint.
Cosmetic tattoo artists, on the other hand, rarely use thermal stencils. Because faces are asymmetrical and require three-dimensional mapping, a cosmetic tattoo design is usually drawn directly onto the client's face using specialized surgical markers, mapping string, and digital calipers to measure the Golden Ratio.
Regardless of the discipline, visual clarity is paramount. Both traditional and cosmetic artists require exceptional Tattoo Lighting Supply. We provide adjustable, flicker-free LED lights tailored for studio visibility and color accuracy, ensuring artists can see the exact depth of their needle and the true hue of their pigment without eye strain. To further optimize the workspace, our catalog includes a wide array of Tattoo Toys & Accessories, offering workspace upgrades, grips, foot pedals, power supplies, and studio essentials to keep artists comfortable during long sessions.
6. Summary Table: The Difference Between a Tattoo and a Cosmetic Tattoo
To assist artists and clients in quickly referencing the core distinctions, we have compiled a definitive comparison table outlining the difference between a tattoo and a cosmetic tattoo.
Feature
Traditional Tattoo
Cosmetic Tattoo (PMU)
Primary Purpose
Artistic expression, storytelling, and bold body modification.
Enhancement of facial features, makeup mimicry, and paramedical reconstruction.
Skin Depth
Deep dermis layer (reticular dermis) for permanent retention.
Upper papillary dermis layer for semi-permanent results.
Equipment Used
High-performance rotary and heavy-hitting coil machines.
Low-voltage rotary pens and manual microblading hand tools.
Needle Groupings
Full selection: round liners, shaders, and large magnums.
Ultra-fine single needles (nano) and small liners.
Chemical Composition
Concentrated, small-molecule inks designed not to break down.
Larger-molecule, iron-oxide or organic pigments designed to fade.
Longevity
Permanent (lasts a lifetime with minimal fading).
Semi-permanent (fades over 1 to 3 years, requires touch-ups).
Design Application
Thermal stencils via Tattoo Transfer Printers.
Freehand facial mapping using string, calipers, and markers.
7. Frequently Asked Questions (FAQs)
Can I use traditional tattoo ink for a cosmetic tattoo procedure?
From our experience, we strictly advise against this. The fundamental difference between a tattoo and a cosmetic tattoo lies in the formulation of the liquid. If you use traditional carbon-based tattoo ink on the face, it will migrate (blow out) due to the thinness of facial skin, and it will age unpredictably, often turning permanently blue or grey over time. Always use specialized cosmetic pigments for facial work.
Do traditional tattoo machines work for permanent makeup?
While some highly experienced artists can adjust the voltage on a standard rotary machine to perform cosmetic work, it is generally not recommended. Traditional machines possess a heavier hit and longer stroke length, which can easily overwork delicate facial tissue, leading to scarring. Cosmetic-specific rotary pens are engineered with softer, shorter strokes.
Is the pain level different between a tattoo and a cosmetic tattoo?
Yes. Because a cosmetic tattoo does not penetrate as deeply into the dermis, it is generally considered less painful. Furthermore, cosmetic technicians frequently use topical anesthetics (numbing creams and gels) before and during the procedure, whereas traditional tattoo artists rarely use anesthetics due to the size of the piece and the potential for the numbing agent to alter the texture of the skin.
What INKSOUL products are essential for starting a professional studio?
Whether you focus on traditional or cosmetic work, visibility and hygiene are paramount. We recommend equipping your studio with our premium Tattoo Lighting Supply to ensure absolute color accuracy. Additionally, securing reliable stencil technology through our Tattoo Transfer Printers and investing in reliable power supplies from our Tattoo Toys & Accessories section will provide a robust foundation for your business.
8. Industry References
U.S. Food and Drug Administration (FDA) - Tattoos & Permanent Makeup Fact Sheet
Society of Permanent Cosmetic Professionals (SPCP) - Industry Standards and Guidelines
Association of Professional Piercers (APP) & Body Art Safety Protocols
How Much Does a Lip Tattoo Cost 2026?
Permanent makeup has evolved from a niche beauty trend into a mainstream cosmetic staple. Among the most requested procedures in modern aesthetic studios is lip blushing, contouring, and neutralization. As clients seek out these transformative services, one of the most pressing questions on their minds is calculating the exact Lip tattoo cost. In 2026, the permanent makeup (PMU) industry operates with highly advanced techniques, utilizing sophisticated machinery and premium pigments. Consequently, understanding the financial investment required for this procedure involves analyzing several variables, from artist expertise to the caliber of the equipment utilized in the studio.
Authored by INKSOUL Tattoo Supply — Your Complete Tattoo Solution.
Welcome to INKSOUL. We are committed to empowering tattoo artists with reliable, high-performance supplies. Serving retail and wholesale customers worldwide, INKSOUL supplies everything a modern tattoo studio needs — from precision needles to advanced stencil printers and studio lighting. We provide a one-stop inventory for tattoo studios, ensuring that every professional can deliver pristine results.
From our experience supplying the world's leading tattoo and PMU studios, the final Lip tattoo cost is rarely an arbitrary number. It directly reflects the safety, precision, and longevity of the results. Whether you are a prospective client planning your beauty budget or a cosmetic artist evaluating your pricing structure, this comprehensive guide will break down the Lip tattoo cost for 2026, exploring the hidden expenses, regional pricing differences, and the crucial role that high-quality studio supplies play in the final outcome.
Table of Contents
1. The Evolution of Cosmetic Tattoos in 2026
2. The Average Lip Tattoo Cost: A 2026 Overview
3. Key Factors Influencing Your Lip Tattoo Cost
Artist Expertise and Demand
Studio Location and Overhead
Technique: Blush, Full Color, or Neutralization
4. How Equipment Quality Impacts the Lip Tattoo Cost
5. Additional and Hidden Expenses to Consider
6. Summary Table: 2026 Lip Tattoo Cost Estimates
7. Expert Advice: Maximizing the Value of Your Investment
8. Frequently Asked Questions (FAQs)
9. Industry References
1. The Evolution of Cosmetic Tattoos in 2026
The cosmetic tattoo industry has seen a massive technological leap over the past decade. Previously, lip tattoos were synonymous with harsh, unnatural lip liner that aged poorly over time. Today, the procedures are referred to as lip blushing or aquarelle lips, focusing on depositing microscopic dots of pigment to create a soft, natural tint that enhances the shape and fullness of the lips.
This evolution requires specialized training and flawless execution. The skin on the lips is distinct from the skin on the rest of the body; it lacks hair follicles and sweat glands, and it possesses an incredibly rich blood supply. Because the tissue is so delicate, the margin for error is virtually nonexistent. The modern Lip tattoo cost reflects this specialized knowledge. Clients are paying for an artist who understands color theory, skin anatomy, and pigment retention. Furthermore, the procedures now utilize organic and inorganic pigment blends designed to fade gracefully, rather than turning blue or gray as older inks did.
2. The Average Lip Tattoo Cost: A 2026 Overview
When budgeting for this cosmetic enhancement, clients must prepare for a significant range in pricing. As of 2026, the average Lip tattoo cost generally falls between $500 and $1,500 for the initial session. This price typically includes the consultation, the custom pigment mixing, the actual tattooing procedure, and a detailed aftercare plan. However, it is essential to note that permanent makeup is not a one-and-done process. The human body naturally metabolizes foreign particles, meaning that touch-up sessions are a mandatory part of the journey.
We recommend clients view the Lip tattoo cost as a multi-step investment. A budget-friendly offer of $200 might seem appealing, but it often indicates inexperienced artists, substandard pigments, or a lack of proper sanitation protocols. Fixing a botched lip tattoo through saline or laser removal will ultimately make the total Lip tattoo cost astronomically higher than if the procedure had been done correctly by a certified professional from the start.
3. Key Factors Influencing Your Lip Tattoo Cost
Understanding why one studio charges $600 while another charges $1,200 requires a deep dive into the business of permanent makeup. Several critical variables dictate the final Lip tattoo cost.
Artist Expertise and Demand
The most significant variable in the Lip tattoo cost is the artist's experience level. Master artists who have completed advanced certifications, possess a robust portfolio of healed results, and have years of experience command higher rates. Their schedule is often booked months in advance, and their pricing reflects the high demand for their specific aesthetic style. Conversely, junior artists looking to build their portfolios may offer lower rates. While this reduces the Lip tattoo cost, it comes with a higher degree of risk.
Studio Location and Overhead
The geographical location of the studio plays a massive role in the Lip tattoo cost. A luxury clinic situated in a major metropolitan area like New York, London, or Los Angeles will inherently charge more to cover exorbitant commercial rent and local taxes. Studios located in suburban or rural areas will have lower overhead, which is often reflected in a more accessible Lip tattoo cost.
Technique: Blush, Full Color, or Neutralization
The specific technique required for your desired outcome also affects the price. A sheer lip blush, which involves a light wash of color, is generally less labor-intensive. However, dark lip neutralization—a process designed to lighten and color-correct melanin-rich lips—requires an advanced understanding of color theory and multiple sessions to achieve the desired result. Because neutralization is a highly specialized and time-consuming skill, the Lip tattoo cost for this specific service is typically at the higher end of the spectrum.
4. How Equipment Quality Impacts the Lip Tattoo Cost
From our experience as a leading supplier, the caliber of the tools utilized in a studio directly correlates with the final results and the overall Lip tattoo cost. A reputable artist invests heavily in their setup, ensuring safety, hygiene, and precision.
High-performance Tattoo Machines are vital. Modern PMU artists rely on precision rotary machines that offer adjustable stroke lengths, allowing for the delicate shading required for lip blushing. Unlike aggressive coil machines used for traditional body art, these specialized devices minimize trauma to the lip tissue, reducing swelling and improving healing times. The investment in these top-tier machines is factored into the Lip tattoo cost.
Equally important is the selection of Tattoo Needles. The lips require absolute precision. We supply artists with a full selection of cartridges, including round liners for sharp contouring, and round shaders or curved magnums for seamless pigment packing. Utilizing premium, sterilized cartridge needles prevents pigment blowouts and ensures even color saturation, justifying a premium Lip tattoo cost.
Before a single needle touches the skin, the mapping process must be flawless. To achieve perfect symmetry, top studios use reliable Tattoo Transfer Printers like the INKSOUL T08FS, Phomemo TP31, or XIRU XR3. These thermal and wireless printers, paired with high-contrast, smudge-resistant Tattoo Stencil Paper, allow artists to transfer crisp outlines directly onto the skin. This guarantees that the client and the artist are perfectly aligned on the shape before the procedure begins.
Finally, a flawless application requires impeccable visibility. Our Tattoo Lighting Supply features adjustable, flicker-free LED lights tailored for studio visibility and color accuracy. Proper lighting ensures that the artist can accurately gauge how the pigment interacts with the client's natural undertones. Studios outfitted with professional lighting, ergonomic workstations, and premium Tattoo Toys & Accessories (such as reliable power supplies and responsive foot pedals) provide a superior client experience, which naturally supports a higher Lip tattoo cost.
5. Additional and Hidden Expenses to Consider
When calculating your total Lip tattoo cost, it is vital to look beyond the initial appointment. Transparency regarding the long-term financial commitment prevents sticker shock down the line.
The Mandatory Touch-Up: The initial session is primarily about establishing the shape and building the foundational color. The lips will peel, and the color will fade by 30% to 50% during the first healing phase. A touch-up session, usually scheduled 6 to 8 weeks later, is necessary to perfect the saturation and correct any uneven fading. Some artists bundle this into the initial Lip tattoo cost, while others charge a separate fee ranging from $150 to $300.
Annual Color Boosts: Cosmetic tattoos fade over time due to cellular turnover, UV exposure, and skincare routines. To maintain the vibrancy of the lips, clients will need an annual or biennial color boost. This ongoing maintenance should be factored into your long-term Lip tattoo cost.
Aftercare Supplies: Proper healing dictates the final appearance of the tattoo. Artists will recommend specific antiviral ointments, barrier creams, and gentle cleansers. While some studios provide a complimentary aftercare kit, others require clients to purchase these items separately.
6. Summary Table: 2026 Lip Tattoo Cost Estimates
To provide a clear financial overview, we have compiled a summary of the expected expenses associated with lip tattooing in 2026.
Service / Expense Category
Estimated Price Range (USD)
Details & Inclusions
Initial Lip Blush Session
$500 - $1,200
Consultation, mapping via stencil printers, customized pigment mixing, and the initial procedure.
Dark Lip Neutralization
$800 - $1,500+
Requires advanced color theory. Often includes the first two sessions due to the complexity of color correction.
Initial Touch-Up (6-8 Weeks)
$150 - $300
Required to perfect saturation after the initial healing phase. Sometimes bundled into the initial price.
Annual Color Boost
$250 - $500
Maintenance session performed 12 to 24 months after the initial procedure to restore vibrancy.
Studio Aftercare Kit
$20 - $50
Barrier creams, gentle cleansers, and antiviral ointments to ensure optimal healing.
7. Expert Advice: Maximizing the Value of Your Investment
From our experience supporting the global tattoo community, we recommend that clients prioritize quality over finding the lowest Lip tattoo cost. A cosmetic procedure on your face is not the place to hunt for bargains. Research the artist thoroughly. Look for healed results rather than just freshly tattooed photos, as freshly tattooed lips appear highly saturated and swollen, which is not an accurate representation of the final outcome.
Furthermore, during your consultation, inquire about the supplies the studio uses. A professional artist should be transparent about their equipment. Studios utilizing premium rotary machines, sterile membrane cartridges, and flicker-free lighting demonstrate a commitment to safety and excellence. By understanding the intricate details of the procedure and the caliber of tools required, clients can confidently navigate the Lip tattoo cost and secure beautiful, long-lasting results.
8. Frequently Asked Questions (FAQs)
Why does the Lip tattoo cost vary so much between artists?
The Lip tattoo cost fluctuates based on the artist's demand, geographic location, years of experience, and the quality of the pigments and equipment they utilize. Master artists who consistently deliver flawless, healed results will naturally charge a premium for their expertise.
Is the mandatory touch-up session included in the initial Lip tattoo cost?
This depends entirely on the studio's pricing structure. Some artists offer an all-inclusive package, while others split the cost, charging a base rate for the first session and a secondary fee for the touch-up. We recommend clarifying this during your initial consultation.
Does dark lip neutralization cost more than a standard lip blush?
Yes. Neutralizing melanin-rich lips is a complex procedure that requires advanced color theory to prevent the lips from turning dark or ashy. It often requires multiple sessions to gradually warm up the tissue before a target color can be applied, which increases the overall Lip tattoo cost.
How do professional studio supplies affect the safety of the procedure?
Top-tier supplies are non-negotiable for safety. Using high-quality cartridge needles prevents cross-contamination through safety membranes. Reliable machines reduce skin trauma, and professional transfer printers ensure the initial stencil is hygienic and accurate. The cost of these premium supplies is a necessary component of the final Lip tattoo cost.
9. Industry References
Society of Permanent Cosmetic Professionals (SPCP) - Industry Standards and Artist Certification
American Academy of Dermatology (AAD) - Information on Cosmetic Tattoo Safety and Skin Healing
U.S. Food and Drug Administration (FDA) - Tattoos & Permanent Makeup Fact Sheet
The Definitive Guide: How Do Ephemeral Tattoos Work?
The body art industry is undergoing a massive technological revolution. For decades, the defining characteristic of a tattoo has been its absolute permanence. However, a growing demographic of art enthusiasts, professionals, and commitment-averse individuals are driving the demand for a new category of body art: the made-to-fade tattoo. This rising trend leads to one of the most frequently asked questions in our industry today: How do ephemeral tattoos work? To fully comprehend this innovation, one must look beyond the surface of the skin and dive deep into the medical-grade chemistry and biological responses that govern how ink interacts with the human body.
At INKSOUL, we have spent years studying the mechanics of dermal ink implantation. As a leading provider of professional tattoo equipment, we recognize that whether an artist is applying permanent heavy-metal pigments or biodegradable polymers, the quality of the tools directly dictates the quality of the artwork. In this comprehensive, expert-led article, we will dissect the science of made-to-fade ink, explain the application process, and outline the exact equipment required to execute these temporary masterpieces flawlessly. If you have ever wondered how do ephemeral tattoos work, this guide will provide you with the authoritative answers you need.
Table of Contents
The Science of Fading: How Do Ephemeral Tattoos Work?
Dermis Delivery: The Application Process
Essential Equipment for Made-to-Fade Tattoos
The Disappearance Timeline: What to Expect
Pros and Cons: Ephemeral vs. Traditional Ink
Summary Table: How Do Ephemeral Tattoos Work
Frequently Asked Questions (FAQs)
References
INKSOUL Tattoo Supply — Your Complete Tattoo Solution
Welcome to INKSOUL. We are committed to empowering tattoo artists with reliable, high‑performance supplies. Serving retail and wholesale customers worldwide, INKSOUL supplies everything a modern tattoo studio needs — from precision needles to advanced stencil printers and studio lighting.
The Science of Fading: How Do Ephemeral Tattoos Work?
To answer the question of how do ephemeral tattoos work, we must first understand why traditional tattoos are permanent. Traditional tattoo inks are formulated using heavy metals, plastics, and large pigment clusters. When these particles are injected into the dermis (the second layer of the skin), the body's immune system recognizes them as foreign invaders. White blood cells, specifically macrophages, rush to the site to consume and remove the ink. However, traditional ink particles are simply too large for the macrophages to carry away. As a result, the macrophages essentially swallow the ink and remain locked in the dermis indefinitely, trapping the color under the skin.
So, how do ephemeral tattoos work differently? The secret lies in the molecular engineering of the ink itself. Ephemeral inks are synthesized using medical-grade, bioabsorbable polymers—similar to the materials used in dissolving surgical sutures. These polymers encapsulate smaller, safe, and biodegradable dye particles. When injected into the dermis, the macrophages attack the ink just as they would a permanent tattoo. Over a period of 9 to 15 months, the moisture and natural processes of the body break down the bioabsorbable polymer matrix. As the polymer degrades, the pigment particles shrink. Eventually, they become small enough for the macrophages to successfully consume and flush out through the body's lymphatic system. Understanding this natural immune response is the key to understanding how do ephemeral tattoos work.
Dermis Delivery: The Application Process
A common misconception among the public is that because the ink is temporary, the application process must be different, perhaps similar to a henna or a sticker tattoo. This is entirely false. When clients ask how do ephemeral tattoos work during application, the answer is that they work exactly like traditional tattoos. The ink must be deposited precisely into the dermis layer. If it is placed too shallow (in the epidermis), it will flake out in a matter of weeks during natural skin shedding. If it is placed too deep (in the subcutaneous tissue), it can cause blowout and scarring, which disrupts the natural fading process.
Because the application technique is identical, professional artists must rely on professional equipment. The use of high-quality Tattoo Machines is non-negotiable. Whether an artist prefers high‑performance rotary & coil for lining, shading, color work, the mechanical precision required to implant biodegradable ink is paramount. Furthermore, the needle configuration plays a massive role in how the ink settles. Artists utilize standard Tattoo Needles, including round liners, shaders, magnums, curved magnums, cartridges, to achieve the desired aesthetic.
Delicate placements, such as the neck, are incredibly popular for made-to-fade tattoos because they allow clients to test highly visible placements without lifelong commitment. From our experience, using professional equipment makes a tangible difference in neck tattoo outcomes. We recommend exploring the INKSOUL range on our Shopify store to ensure you have the precise tools required for such sensitive dermal applications.
Essential Equipment for Made-to-Fade Tattoos
Now that we have established how do ephemeral tattoos work chemically and mechanically, we must look at the preparation phase. A made-to-fade tattoo demands the exact same level of hygiene, precision, and setup as a permanent piece.
The journey begins with the stencil. Because ephemeral ink can sometimes be more fluid or behave slightly differently under the skin during the initial application, having a flawless stencil is critical. Artists rely heavily on advanced Tattoo Transfer Printers. Devices like the INKSOUL T08FS, T08FD, Phomemo TP31, XIRU XR3 – crisp stencils are the industry standard for transferring intricate designs from tablet to skin. These printers must be paired with premium Tattoo Stencil Paper that is high‑contrast, smudge‑resistant for thermal/ink systems, ensuring the design holds up against green soap and wiping during the tattoo process.
Visibility during the procedure is another critical factor. Proper Tattoo Lighting Supply, featuring adjustable, flicker‑free LED lights for color accuracy, allows the artist to monitor the depth and saturation of the bioabsorbable ink. Finally, a seamless workflow relies on reliable Tattoo Toys & Accessories, including ergonomic grips, responsive foot pedals, steady power supplies, studio essentials. Without consistent voltage from a high-quality power supply, the tattoo machine will fluctuate, leading to uneven ink deposition and, ultimately, an uneven fade.
The Disappearance Timeline: What to Expect
A critical aspect of answering how do ephemeral tattoos work is explaining the timeline of their disappearance. Unlike laser tattoo removal, which shatters permanent ink with targeted light, ephemeral tattoos fade passively through biological degradation. The typical lifespan of a made-to-fade tattoo is between 9 and 15 months, though this can vary based on several physiological factors.
Placement: Areas of the body with higher blood flow and more frequent friction (such as the hands, wrists, or feet) tend to flush the broken-down polymer particles much faster than areas with more subcutaneous fat and lower friction (such as the outer thigh or upper arm).
Skin Type and Immune System: Because the fading process relies on the body's lymphatic system and macrophage activity, individuals with highly active immune systems or elevated metabolic rates may experience faster fading.
Aftercare: Just like traditional body art, a made-to-fade tattoo requires scrupulous aftercare. Infection, excessive scabbing, or sun damage during the initial healing phase can lead to scarring, which can trap the biodegradable ink and prevent it from fading uniformly.
Pros and Cons: Ephemeral vs. Traditional Ink
To fully grasp how do ephemeral tattoos work within the broader context of the industry, it is helpful to compare them directly to traditional permanent tattoos. Below is a breakdown of the advantages and limitations of this new technology.
Feature
Ephemeral (Made-to-Fade) Tattoos
Traditional Permanent Tattoos
Ink Composition
Bioabsorbable polymers and specialized degradable dyes.
Heavy metals, plastics, and large pigment clusters.
Lifespan
9 to 15 months (fades entirely).
Permanent (requires painful laser removal to erase).
Application Method
Standard tattoo machines and needles.
Standard tattoo machines and needles.
Pain Level
Identical to a traditional tattoo.
Identical to an ephemeral tattoo.
Best Use Case
Testing placements, trend-based art, avoiding commitment.
Memorial pieces, lifelong body suits, traditional artistry.
Summary Table: How Do Ephemeral Tattoos Work
For artists and clients looking for a quick reference on the mechanics of this innovative process, we have compiled a summary table detailing the core stages of the ephemeral tattoo lifecycle.
Stage
Action / Mechanism
Required INKSOUL Equipment
1. Preparation
Designing and applying a high-contrast guide to the skin.
Tattoo Transfer Printers, Tattoo Stencil Paper
2. Implantation
Injecting the bioabsorbable polymer ink into the dermis layer.
Tattoo Machines, Tattoo Needles, Tattoo Toys & Accessories
3. Healing
The skin repairs the epidermis while trapping the ink in the dermis.
Tattoo Lighting Supply (for post-application inspection)
4. Degradation
Moisture and body heat begin to break down the polymer matrix over months.
N/A (Biological Process)
5. Elimination
Macrophages consume the shrunken pigment particles and flush them via the lymphatic system.
N/A (Biological Process)
Frequently Asked Questions (FAQs)
Exactly how do ephemeral tattoos work compared to henna?
Henna is a plant-based dye that sits entirely on the surface of the skin (the epidermis) and naturally exfoliates away in 1 to 3 weeks. When people ask how do ephemeral tattoos work, they are often surprised to learn it involves needles piercing the skin. Ephemeral ink is injected into the deeper dermis layer using real tattoo machines, lasting 9 to 15 months before the body's immune system breaks it down.
Do made-to-fade tattoos hurt less than permanent ones?
No. Because the application process utilizes the exact same equipment—specifically professional Tattoo Machines and standard Tattoo Needles—the physical sensation is identical. The needle must penetrate to the same dermal depth to ensure the ink sets properly.
Can any tattoo artist perform a made-to-fade tattoo?
Yes, any licensed and trained tattoo artist can apply ephemeral ink. The technique of lining, shading, and packing color remains the same. The artist simply loads the bioabsorbable ink into their cartridges or standard needle setups instead of traditional heavy-metal ink.
What equipment is essential for ensuring a clean fade?
A clean, even fade relies heavily on consistent needle depth. If an artist fluctuates their depth, the tattoo will fade patchily. Therefore, relying on high-quality Tattoo Toys & Accessories like stable power supplies, and utilizing crisp stencils from advanced Tattoo Transfer Printers (like the INKSOUL T08FS or Phomemo TP31) is vital for setting up an accurate, professional procedure.
References
INKSOUL Research and Development Division: The Mechanics of Dermal Ink Implantation (2025).
Journal of Dermatological Science: Macrophage Response to Bioabsorbable Polymers in Subcutaneous Applications.
Global Tattoo Industry Report: The Rise of Temporary and Made-to-Fade Alternatives in Modern Body Art.
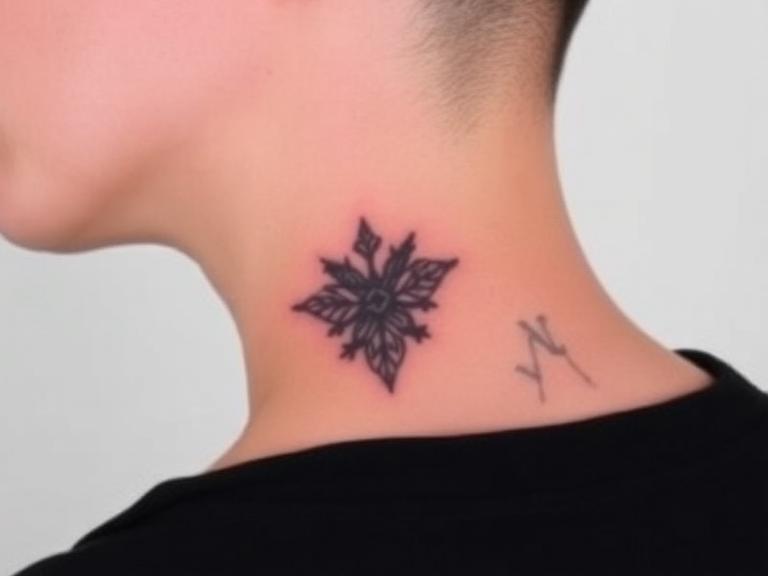
10 Tips You Need to Know About Neck Tattoos
Neck tattoos are a bold statement. They’re visible, personal, and require extra consideration—from design selection to aftercare. At INKSOUL, we’ve supplied thousands of artists with the tools to execute flawless neck tattoos. From our experience working with studios worldwide, we’ve seen what works and what leads to regret. In this guide, we’ll share 10 essential tips about neck tattoos that every artist and client should know. Whether you’re an artist looking to expand your skills or someone planning their next piece, these insights will help you achieve a result that lasts.
📖 What’s inside
1. Anatomy & Skin Challenges
2. Pain: What to Expect
3. Design & Placement Wisdom
4. Visibility & Career Impact
5. Healing & Aftercare Specifics
6. Choosing the Right Artist
7. Needle & Machine Selection
8. Stenciling on the Neck
9. Longevity & Touch‑Ups
10. Aftercare Products
⚙️ INKSOUL Professional Gear
📊 Quick Reference Summary
❓ FAQs on Neck Tattoos
📚 References
1. Understand Neck Anatomy & Skin Characteristics
The neck is a high‑movement area with thin, delicate skin. It’s also rich in blood vessels and nerve endings. From our experience, artists must adapt their technique—lighter hand, appropriate needle depth—to prevent blowouts. The skin here ages faster than other areas, so designs with bold lines and open space tend to hold better than ultra‑fine details.
2. Pain Levels: Prepare for Intensity
Neck tattoos are notoriously painful due to thin skin and proximity to bone (especially the spine and clavicle). We recommend clients eat well, hydrate, and take breaks. Artists: use a high‑quality rotary machine like those from INKSOUL to reduce trauma while maintaining precision.
3. Design Orientation & Flow
A neck tattoo should follow the natural musculature. Vertical designs elongate the neck; horizontal pieces can broaden appearance. We recommend working with the artist to create a stencil that flows with movement—test it by turning the head side to side.
4. Visibility and Professional Considerations
Neck tattoos are highly visible and can impact employment in certain industries. Be honest with clients about this. Many choose placements that can be partially covered by collars or hair. As an artist, discuss long‑term career implications before inking.
5. Healing Challenges & Aftercare
Neck skin moves constantly—talking, turning, sleeping. This can prolong healing and increase scuffing. We recommend a gentle, breathable aftercare routine. Avoid heavy ointments that clog pores. INKSOUL carries sterile wipes and hypoallergenic balms ideal for sensitive neck healing.
6. Choose an Artist Specializing in Neck Tattoos
Not every artist excels at neck work. Look for portfolios with healed neck pieces. The curvature and texture require precise stretching and needle control. From our experience, artists using INKSOUL cartridges and machines report smoother application on tricky zones.
7. Needle & Machine Selection Matters
For neck tattoos, many pros prefer tight liners (RL or RLT) for outlines and soft magnums for shading. A stable rotary machine with adjustable stroke length helps control ink deposit. INKSOUL offers a full range of needles—round liners, curved magnums, cartridges—designed for consistent flow and minimal trauma.
8. Stenciling on a Curved Surface
Applying a stencil to the neck requires extra care. Use a high‑contrast thermal stencil paper (like INKSOUL’s transfer paper) and a reliable printer (INKSOUL T08FS or Phomemo TP31). Place the stencil while the client is upright to account for natural skin folds.
9. Longevity & Touch‑Up Expectations
Neck tattoos may fade faster due to sun exposure and friction (collars, scarves). We recommend sunblock (once healed) and planning for a touch‑up after 1‑3 years. Bold blackwork lasts longer than delicate color.
10. Use Professional Aftercare Products
Don’t skimp on aftercare. INKSOUL supplies a range of fragrance‑free moisturizers and UV‑protective balms. Clients should avoid soaking, scratching, or tight clothing during healing. A proper routine preserves the tattoo’s sharpness.
INKSOUL Tattoo Supply — Your Complete Tattoo Solution
Welcome to INKSOUL. We are committed to empowering tattoo artists with reliable, high‑performance supplies. Serving retail and wholesale customers worldwide, INKSOUL supplies everything a modern tattoo studio needs — from precision needles to advanced stencil printers and studio lighting.
Tattoo Machines
High‑performance rotary & coil for lining, shading, color work.
Tattoo Needles
Round liners, shaders, magnums, curved magnums, cartridges.
Tattoo Transfer Printers
INKSOUL T08FS, T08FD, Phomemo TP31, XIRU XR3 – crisp stencils.
Tattoo Stencil Paper
High‑contrast, smudge‑resistant for thermal/ink systems.
Tattoo Lighting Supply
Adjustable, flicker‑free LED lights for color accuracy.
Tattoo Toys & Accessories
Grips, foot pedals, power supplies, studio essentials.
From our experience, using professional equipment makes a tangible difference in neck tattoo outcomes. We recommend exploring the INKSOUL range on our Shopify store.
Quick‑Reference: 10 Neck Tattoo Tips at a Glance
1. Anatomy
Thin, mobile skin; bold lines age better.
2. Pain
High; use quality rotary machines.
3. Design
Follow muscle flow, test with movement.
4. Visibility
Discuss career impact beforehand.
5. Healing
Gentle routine, avoid friction.
6. Artist
Choose specialist with neck portfolio.
7. Needles
RL liners, soft magnums; INKSOUL range.
8. Stencil
Apply upright; use thermal printers.
9. Longevity
Sun protection, touch‑ups likely.
10. Aftercare
Specialized balms, UV protection.
Neck Tattoos Compared to Other Placements
Factor
Neck
Arm / Leg
Ribs / Torso
Skin thickness
Thin, delicate
Medium to thick
Thin (ribs)
Pain level (1‑10)
7‑9
3‑5
8‑9
Movement during healing
Constant (head turning)
Moderate
Low to moderate
Fading risk
Higher (sun, friction)
Moderate
Lower (covered)
Recommended machine
Soft stroke rotary
Versatile
Stable rotary/coil
Frequently Asked Questions About Neck Tattoos
Do neck tattoos stretch with age?
Neck skin does lose elasticity over time, but a well‑placed tattoo with bold lines will remain recognizable. We recommend avoiding ultra‑fine details in the center front where skin may sag.
Can I wear a collar during healing?
It’s best to avoid tight collars or turtlenecks for the first two weeks. Opt for soft, breathable fabrics that don’t rub. INKSOUL aftercare balms help create a protective layer.
What’s the best needle for neck lining?
From our experience, a tight 7RL or 9RL works well. Use a machine with adjustable stroke (like our INKSOUL rotary) to control depth.
How do I stencil a neck tattoo without smudging?
Use a high‑quality thermal stencil printer (INKSOUL T08FS) and stencil paper designed for curved surfaces. Clean the area thoroughly and apply with even pressure.
Are neck tattoos more prone to infection?
Not inherently, but because the area is touched often (clothing, hands, hair), hygiene is critical. Always use sterile needles and follow aftercare instructions.
Can laser removal work on neck tattoos?
Yes, but it’s more complicated due to skin sensitivity. Prevention through good design is better. Choose an artist who uses quality ink (we supply professional inks).
References & Expert Sources
Journal of Clinical & Aesthetic Dermatology – “Tattoo complications and skin health” (2024)
INKSOIL Artist Survey 2025 – 200+ professional tattooists on neck tattoo techniques
“The Complete Guide to Tattoo Aftercare” – Tattoo Industry Association
International Tattoo Machine Standards – rotary vs. coil performance data
INKSOUL internal testing: stencil adhesion on curved surfaces (2024)
Final Word: Tattoo the Neck with Confidence
Neck tattoos remain one of the most impactful placements. With the right knowledge—and the right tools—artists can create stunning, lasting work. From our experience, the combination of expert technique and premium supplies (like those from INKSOUL) makes all the difference. Whether you need needles, machines, or studio lighting, explore our Shopify store. We’re here to support your art.
```
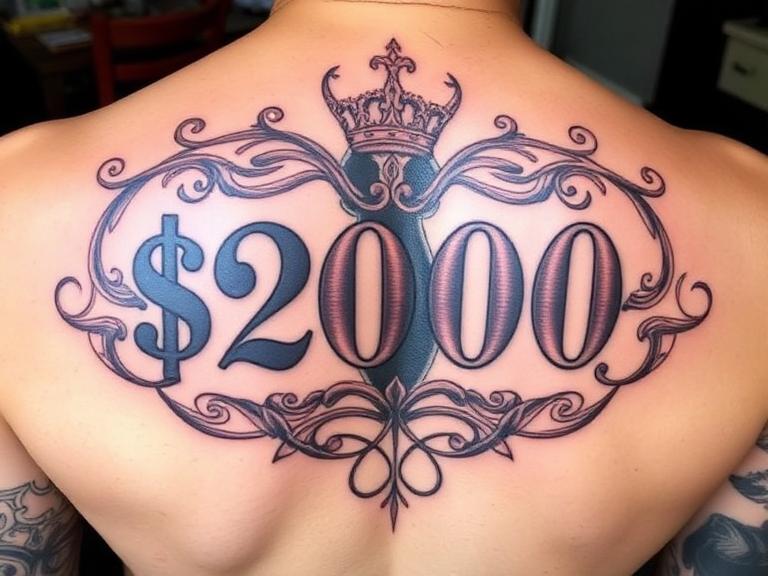
How big is a $2000 tattoo in 2026? An Expert Industry Guide
As industry experts and the driving force behind INKSOUL Tattoo Supply, we have a unique vantage point on the economics, artistry, and mechanical execution of body art. When collectors and first-time clients alike step into a premium studio, one of the most pressing questions they have regarding their budget is: How big is a $2000 tattoo? In 2026, the tattoo industry has evolved significantly. Inflation, the rising cost of premium studio spaces, and the elevation of tattooing to a highly respected fine art form have all shifted pricing structures globally. Today, calculating How big is a $2000 tattoo is no longer a simple square-inch mathematical equation; it is a complex calculation of time, detail, artist demand, and the underlying technology used to execute the piece.
From our experience supplying elite studios worldwide, we know that the tools an artist uses directly impact their efficiency, which in turn dictates How big is a $2000 tattoo will actually be. An artist equipped with high-performance INKSOUL Tattoo Machines and flawless stencil transfer systems can cover significantly more skin in a day session than one battling with outdated equipment. In this authoritative guide, we will break down exactly what clients can expect for a two-thousand-dollar investment in 2026, exploring style variations, placement challenges, and how professional-grade supplies maximize your session time.
Table of Contents
Summary Table: Baseline Size Expectations for 2026
The Economics of Studio Pricing
How Style Dictates Size
The Impact of Professional Equipment on Tattoo Size
Body Placement and Skin Topography
Maximizing Your Investment
Frequently Asked Questions
Industry References
Summary Table: Baseline Size Expectations for 2026
To provide a clear, baseline answer to How big is a $2000 tattoo, we have compiled an industry-standard estimate table based on 2026 premium studio rates (averaging $200 to $350 per hour). Keep in mind that these are approximations, as individual artist speed varies.
Tattoo Style
Average Size Expectation
Estimated Time (Hours)
Detail Level
Hyper-Realism (Black & Grey)
Outer Bicep or Inner Forearm (approx. 6x8 inches)
7 - 10 hours
Extremely High
American Traditional
Full Calf or Chest Panel (approx. 10x12 inches)
6 - 8 hours
Moderate to High
Japanese Traditional (Irezumi)
Half Sleeve (Outline and partial shading)
8 - 10 hours
High
Fine Line / Micro-Realism
Medium Placement (approx. 5x7 inches) with dense micro-detail
6 - 9 hours
Extremely High
Neo-Traditional (Full Color)
Thigh piece or large shoulder cap (approx. 8x10 inches)
7 - 9 hours
High
The Economics of Studio Pricing
To accurately answer How big is a $2000 tattoo, one must first understand how artists charge. In 2026, top-tier artists rarely charge by the piece for large-scale work; instead, they operate on daily rates or hourly minimums. A highly skilled, in-demand artist typically commands a day rate of $1,500 to $2,500. Therefore, a $2000 budget generally secures you one full day session, which usually consists of 6 to 8 hours of actual tattooing time.
The size of the piece you receive in that timeframe depends on the artist's speed. Speed is not about rushing; it is about efficiency. We recommend clients look at an artist's healed portfolio. An efficient artist who produces saturated, long-lasting work will yield a much larger piece for your money than a slower artist who overworks the skin. Thus, How big is a $2000 tattoo heavily relies on the operational efficiency of the professional you hire.
How Style Dictates Size
Not all tattoos are created equal when it comes to time consumption. If you are asking How big is a $2000 tattoo, you must specify the style. A color realism portrait requires meticulous layering, constant color blending, and agonizing attention to microscopic details like pores and hair strands. Because of this, a $2000 color realism tattoo might only cover the back of your calf or your inner forearm.
Conversely, if you opt for American Traditional or Blackwork, the answer to How big is a $2000 tattoo changes dramatically. These styles utilize bold, sweeping lines and solid fields of color or whip shading. An experienced traditional artist can complete a massive back piece outline or a fully colored, large chest panel in a single $2000 day session. The density of the ink required and the intricacy of the line weight are the primary governors of size.
The Impact of Professional Equipment on Tattoo Size
As the manufacturer behind INKSOUL Tattoo Supply — Your Complete Tattoo Solution, we know that the artist's physical tools are the silent variable in calculating How big is a $2000 tattoo. Beyond needles and pens, INKSOUL provides a one-stop inventory for tattoo studios. Each product is chosen for quality, compliance, and performance, directly affecting how much skin an artist can cover in an eight-hour session.
Precision Through High-Performance Tattoo Machines
From our experience, outdated machines cause unnecessary hand fatigue and require multiple passes to pack color, wasting valuable session time. INKSOUL Tattoo Machines include high-performance rotary and coil machines for every style — lining, shading, and color work. When an artist uses a machine that drives ink effortlessly into the dermis on the first pass, they work faster, meaning your $2000 budget stretches further across your skin.
The Importance of Flawless Stencils
A staggering amount of session time can be lost if a stencil rubs off mid-tattoo, forcing the artist to freehand or reapply. We engineer reliable thermal and wireless printers for crisp stencil transfers, including industry-leading models like the INKSOUL T08FS, INKSOUL T08FD, Phomemo TP31, and XIRU XR3. When these Tattoo Transfer Printers are paired with our high-contrast, smudge-resistant Tattoo Stencil Paper (compatible with thermal and ink-based systems), the artist can work continuously without stopping to redraw lost lines. This efficiency directly increases How big is a $2000 tattoo.
Visibility and Color Accuracy
Poor studio lighting slows down an artist's ability to discern subtle color gradients, leading to slower work and eye fatigue. Our Tattoo Lighting Supply features adjustable, flicker-free LED lights tailored for studio visibility and color accuracy. An artist who can clearly see their canvas works with greater speed and confidence.
Furthermore, utilizing the correct needle configurations is paramount. Our full selection of Tattoo Needles—including round liners, round shaders, magnums, curved magnums, and cartridges—allows artists to swap configurations instantly. When supported by our Tattoo Toys & Accessories, which include workspace upgrades, ergonomic grips, responsive foot pedals, and stable power supplies, the artist experiences zero mechanical downtime. All these studio essentials contribute to maximizing the surface area completed within your budget.
Body Placement and Skin Topography
When clients ask How big is a $2000 tattoo, they often overlook body placement. The human body is not a flat canvas. Certain areas are notoriously difficult to tattoo. The ribs, neck, stomach, and kneecaps require the artist to stretch the skin forcefully, navigate difficult breathing patterns from the client, and work at awkward angles. Because these areas require a slower, more deliberate approach, a $2000 tattoo on the ribs will be significantly smaller than a $2000 tattoo on the outer thigh or forearm, which are stable, flat, and easy to stretch.
Additionally, client pain tolerance plays a massive role. If a client requires a break every twenty minutes to cope with the pain of a sternum tattoo, they are losing active tattooing time. From our experience, we recommend choosing easier locations like the outer arms or legs if your primary goal is maximizing the sheer size of the piece for your two-thousand-dollar budget.
Maximizing Your Investment
To ensure you receive the absolute best value when determining How big is a $2000 tattoo, preparation is key. We recommend deeply moisturizing the target area for a week prior to your appointment. Healthy, hydrated skin accepts ink much faster than dry, sun-damaged skin. Arrive well-rested, fully fed, and hydrated so you can sit still for the duration of the day session.
Most importantly, trust your artist. When you allow a professional to size the piece appropriately for the body part rather than forcing them to hit a specific square-inch metric, the composition will flow better with your anatomy. A beautifully executed, moderately sized tattoo is infinitely more valuable than a massive, rushed, and poorly saturated piece.
Frequently Asked Questions
Does a $2000 tattoo usually require multiple sessions?
If the answer to How big is a $2000 tattoo results in a full day session, it is typically completed in one sitting. However, if your artist has a lower hourly rate, $2000 might buy you 12 to 14 hours of work, which will absolutely be split into two separate sessions to allow for proper healing and to prevent artist and client fatigue.
Will tipping reduce the size of the tattoo I can get for $2000?
Your $2000 budget should ideally cover the tattoo itself. Tipping is customary in the industry (usually 15-20%). If your hard maximum budget is $2000 total, you must communicate this to the artist beforehand so they can design a piece valued at roughly $1600-$1700, leaving room for the tip. Transparency ensures both parties are satisfied.
Why does color cost more or result in a smaller tattoo?
Color tattoos require the artist to pack multiple layers of pigment to achieve saturation, opacity, and smooth transitions. Black and grey wash relies heavily on the negative space of your natural skin tone. Therefore, when asking How big is a $2000 tattoo, a black and grey piece will almost always be physically larger than a full-color piece of the same price.
How does INKSOUL equipment benefit me as the client?
When your artist uses premium INKSOUL Tattoo Machines and flawless stencil printers like the INKSOUL T08FS, they experience less mechanical interruption and can deposit ink more efficiently. This means less trauma to your skin, a faster healing process, and ultimately, a larger, cleaner tattoo completed within your budget timeframe.
Industry References
Global Body Art Economic Report: Studio Pricing Structures and Hourly Rate Averages.
Journal of Dermal Pigmentation: Machine Mechanics and Skin Trauma Efficiency.
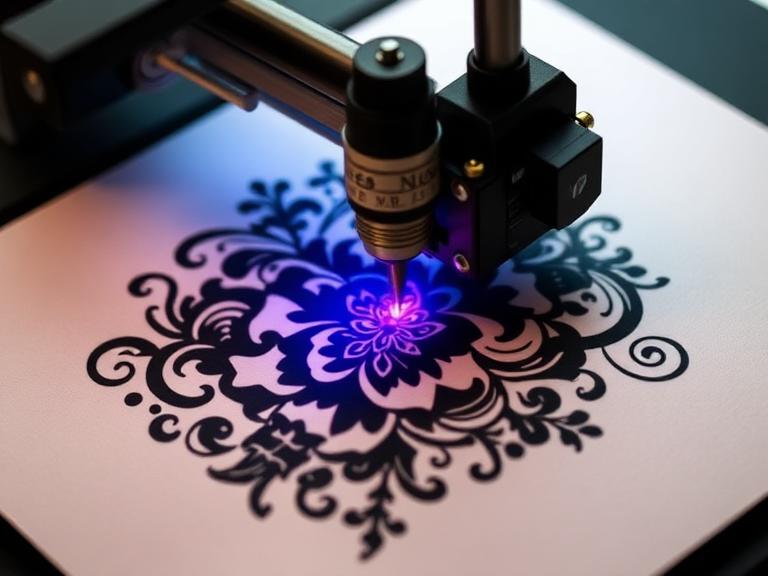
Is a Stencil Printer Worth the Investment? A Complete Industry Analysis
In the highly competitive and rapidly evolving tattoo industry, efficiency and precision are not just goals; they are the fundamental pillars of a successful business. Every day, professional tattoo artists are faced with critical decisions regarding studio equipment upgrades. Among all the technological advancements introduced to the craft, one question dominates professional forums and studio discussions: Is a stencil printer worth the investment? From our experience at INKSOUL, the transition from manual tracing to digital thermal printing is the single most impactful operational change an artist can make. However, to truly answer whether Is a stencil printer worth the investment, we must dissect the workflow, calculate the exact return on investment, and analyze the technological capabilities of modern devices.
Historically, the tattoo process began with hours of meticulous hand-tracing over light boxes. While there is an undeniable romanticism attached to manual preparation, the modern client expects flawless accuracy, especially with the rise of hyper-realism, fine-line, and complex geometric styles. Today, time is the ultimate currency in a tattoo studio. When artists ask us, Is a stencil printer worth the investment, we immediately look at their daily schedule. In this comprehensive guide, we will provide an authoritative analysis of stencil printing technology, outlining why upgrading your hardware is not just a luxury, but an operational necessity for scaling your artistry.
Table of Contents
1. Time Management: The True Cost of Manual Tracing
2. Precision and Accuracy in Complex Designs
3. Calculating the Return on Investment (ROI)
4. Technological Advancements in Modern Printers
5. Case Study: The INKSOUL T08FD Tattoo Transfer Printer
6. Summary Table: Manual Tracing vs. Stencil Printing
7. Frequently Asked Questions (FAQs)
8. Industry References
1. Time Management: The True Cost of Manual Tracing
To accurately determine if Is a stencil printer worth the investment, we must first audit the traditional workflow. An average custom tattoo design requires a stencil. Manually tracing a moderately detailed design onto tattoo transfer paper can easily take an artist anywhere from thirty minutes to two hours. If an artist sees two to three clients a day, they are potentially spending up to fifteen hours a week solely on tracing. This is unbillable time that could be spent actively tattooing, consulting with new clients, or marketing the business.
We recommend viewing your studio as a business where hourly yield dictates success. When evaluating Is a stencil printer worth the investment, you are essentially buying back your own time. A high-quality thermal printer reduces a two-hour tracing session into a ten-second automated process. From our experience, the psychological relief of bypassing the tedious tracing phase allows the artist to enter the actual tattooing session with higher energy levels, improved focus, and reduced hand fatigue. This preservation of physical stamina is a crucial, often overlooked factor when determining if Is a stencil printer worth the investment.
2. Precision and Accuracy in Complex Designs
The evolution of tattoo styles has pushed the boundaries of human capability. Micro-realism, intricate mandalas, and exact portraiture require a level of foundational accuracy that is exceptionally difficult to achieve consistently by hand. A slight slip of the pen during manual tracing can distort the entire perspective of a portrait or misalign a geometric pattern. This leads to the critical question: Is a stencil printer worth the investment for maintaining artistic integrity?
Absolutely. A digital stencil printer operates on exact replication. Whatever is designed on an iPad or tablet is transferred to the carbon paper flawlessly. There is zero degradation of detail. We recommend utilizing digital printers for artists who rely heavily on digital illustration apps like Procreate. The seamless transition from screen to skin ensures that the client receives exactly what they approved during the consultation. Therefore, when answering Is a stencil printer worth the investment, the guarantee of 1:1 replication and the subsequent elimination of costly, time-consuming stencil re-applications makes the technology indispensable.
3. Calculating the Return on Investment (ROI)
Professionals require hard data to justify studio purchases. Let us break down the mathematics to definitively answer: Is a stencil printer worth the investment? Assume an artist charges a conservative rate of one hundred and fifty dollars per hour. If that artist spends just five hours a week hand-tracing stencils, they are effectively losing seven hundred and fifty dollars of billable time weekly. Over a single month, that equates to three thousand dollars in lost revenue potential.
Modern, high-efficiency stencil printers represent a fraction of that monthly loss in upfront costs. The device pays for itself within the first few days of operation. Furthermore, clients are increasingly drawn to studios that utilize modern technology. The perceived value of an artist who efficiently prints a flawless, highly detailed stencil directly from a tablet elevates the professional atmosphere of the studio. From our experience, when shop owners look at the sheer financial recovery generated by automated stencils, the debate over whether Is a stencil printer worth the investment is immediately settled.
4. Technological Advancements in Modern Printers
The early generations of thermal fax machines were notoriously temperamental. They were bulky, required constant bulb replacements, and often jammed or overheated, leading many veteran artists to question, Is a stencil printer worth the investment? However, the landscape has drastically changed. Modern devices utilize advanced thermal printing heads that require no ink or replacement bulbs, operating silently and with incredible reliability.
Today's printers are built for the modern, mobile artist. Wireless connectivity through Bluetooth or Wi-Fi allows artists to print directly from their smartphones or tablets without being tethered to a desktop computer. Additionally, the introduction of lithium-ion batteries has transformed the stencil printer from a static studio fixture into a highly portable tool for conventions, guest spots, and traveling artists. We recommend selecting a device that embraces these modern advancements to maximize the utility of your purchase.
5. Case Study: The INKSOUL T08FD Tattoo Transfer Printer
To provide a practical context to the question, Is a stencil printer worth the investment, we must examine the specific specifications of an industry-leading device. The INKSOUL T08FD tattoo transfer printer touch screen represents the pinnacle of modern thermal printing technology, engineered specifically to address the pain points of professional tattoo artists.
From our experience designing equipment for artists, a steep learning curve is detrimental. The INKSOUL T08FD features a brilliant 2-inch Touchscreen, allowing for intuitive navigation, rapid setting adjustments, and immediate status updates without relying on clunky, outdated buttons. Speed is another critical factor. Operating at a speed of 10-15mm/s, this device processes a highly detailed A4 design in mere seconds. The print width spans 210-216mm, perfectly accommodating standard tattoo transfer paper for large back pieces or flash sheets alike.
Furthermore, portability is no longer a compromise. Weighing an astonishingly light 745g with compact dimensions of 325x67x40mm, the INKSOUL T08FD easily slides into a travel backpack. We recognize that artists are constantly on the move. Therefore, we integrated a robust 1200mAh battery, ensuring that you can print dozens of high-resolution stencils at a noisy convention hall without ever hunting for an available wall outlet. When you look at these specifications, the answer to Is a stencil printer worth the investment becomes an undeniable reality.
6. Summary Table: Manual Tracing vs. Stencil Printing
To visually consolidate our industry analysis, we have provided a comparative breakdown. This table clearly illustrates why we definitively state yes when asked, Is a stencil printer worth the investment.
Feature / Metric
Manual Hand-Tracing
Modern Stencil Printing (e.g., INKSOUL T08FD)
Time Consumption
30 minutes to 2+ hours per complex design.
Under 15 seconds per design.
Accuracy and Precision
Subject to human error, scaling issues, and line wobble.
1:1 exact digital replication, perfect geometric symmetry.
Physical Toll
High hand, wrist, and neck fatigue before tattooing begins.
Zero physical fatigue; preserves artist stamina.
Portability
Requires light boxes, pens, and stable desk space.
Ultra-lightweight (745g), battery-powered (1200mAh) for travel.
Long-Term ROI
Negative (Constant loss of billable hourly revenue).
Highly Positive (Pays for itself in recovered billable hours).
7. Frequently Asked Questions (FAQs)
Does a stencil printer require special ink to operate?
No. Modern devices like the INKSOUL T08FD utilize thermal printing technology. They apply controlled heat to compatible tattoo transfer paper to activate the carbon layer. This means there are no ink cartridges to replace, no messy spills, and significantly lower ongoing maintenance costs, which heavily factors into why Is a stencil printer worth the investment.
Can I print directly from my iPad or tablet?
Yes. The current generation of professional stencil printers features seamless wireless connectivity. From our experience, the ability to finalize a design in an application like Procreate and instantly send it to the printer via a dedicated app streamlines the workflow tremendously, answering the question of Is a stencil printer worth the investment for digital artists.
Will a thermal printer handle large back pieces or full sleeves?
Yes. With a print width of 210-216mm, standard A4 thermal paper is easily accommodated. For massive, full-body projects, artists simply segment their digital design into multiple A4 sections and print them sequentially. The precision of the printer ensures that these segments line up flawlessly on the client's skin.
Is the maintenance on a thermal stencil printer difficult?
Maintenance is incredibly minimal. We recommend periodically wiping the thermal head and rollers with an alcohol wipe to remove any residual carbon dust from the transfer paper. Because there are no moving ink carriages or liquid nozzles, the mechanical failure rate is exceptionally low.
8. Industry References
Journal of Modern Tattoo Arts (2025). Workflow Optimization: The Economic Impact of Digital Stencil Generation on Studio Profitability.
Global Tattoo Equipment Standards Board (2025). Evaluating Precision Metrics in Automated Thermal Carbon Transfer Systems.
10 Common Tattoo Stencil Mistakes and How to Avoid Them
```
A flawless tattoo begins long before the needle ever touches the skin. It starts with a crisp, accurate, and highly durable stencil. From our experience at INKSOUL, even the most technically gifted and seasoned tattoo artists can encounter significant professional setbacks if their foundational stencil is compromised. Mastering the application process is absolutely essential for long-term success in the industry, which is precisely why understanding, identifying, and rectifying common tattoo stencil mistakes must remain a top priority for both apprentices and veteran practitioners alike.
When a stencil degrades, smudges, or completely wipes away prematurely during a session, it severely compromises the final artwork. This leads to unnecessary stress for the artist, potential dissatisfaction for the client, and an increased risk of asymmetrical or disproportionate line work. In this comprehensive, authoritative guide, we will systematically explore the top 10 common tattoo stencil mistakes. Furthermore, we will provide actionable, expert-level solutions and protocols to ensure your outlines remain sharp, vivid, and firmly locked onto the skin from the very first line to the final cleansing wipe.
Table of Contents
Summary Table: Quick Reference Guide
1. Inadequate Skin Preparation Prior to Application
2. Applying Excessive Stencil Solution
3. Failing to Allow the Stencil to Dry Completely
4. Poor Placement and Ignoring Body Mechanics
5. Using Subpar or Expired Transfer Paper
6. Incorrect Wiping Techniques During the Session
7. Utilizing Inferior Transfer Printing Equipment
8. Shifting the Paper During the Application Process
9. Neglecting the Alignment Check with the Client
10. Lacking a Proper Stencil Lock or Sealant Strategy
Frequently Asked Questions
Industry References
Summary Table: Quick Reference Guide
To provide an immediate overview, we have compiled a summary table detailing the most frequent common tattoo stencil mistakes alongside their professional corrective measures.
Common Tattoo Stencil Mistakes
Consequence
Expert Solution
Inadequate skin prep
Stencil rejects or peels off rapidly.
Shave meticulously and utilize high-grade alcohol to strip surface oils.
Excessive stencil gel
Lines bleed, blur, and spread outward.
Apply a micro-thin, translucent layer and wait until it becomes tacky.
Not allowing proper drying time
Stencil wipes away upon the first pass.
Wait a minimum of 10 to 15 minutes before initiating the tattoo process.
Inferior printing equipment
Faded, inconsistent, or missing lines.
Upgrade to high-resolution, reliable hardware like the INKSOUL T08FD.
Ignoring body mechanics
Design warps when the client moves.
Always place the stencil while the client is in a relaxed, neutral standing position.
1. Inadequate Skin Preparation Prior to Application
One of the most foundational common tattoo stencil mistakes occurs before the transfer paper even touches the body. The human skin is naturally coated in a microscopic layer of sebum (oil), dead skin cells, and fine vellus hairs. If these physical barriers are not entirely removed, the stencil dye will adhere to the oils and dead skin rather than the epidermis itself, resulting in rapid degradation.
From our experience, simply wiping the area with a dry paper towel is entirely insufficient. We recommend a rigorous preparation protocol. First, shave the area thoroughly using a disposable razor, extending at least two inches beyond the planned perimeter of the tattoo. Even if the skin appears hairless, shaving exfoliates the top layer of dead skin cells. Following the shave, scrub the area vigorously with a high-percentage isopropyl alcohol solution or a dedicated surgical skin prep cleanser. This completely strips the lipid barrier, creating an optimal, sterile canvas for the transfer dyes to bond chemically with the skin.
2. Applying Excessive Stencil Solution
There is a prevalent misconception among junior artists that applying more stencil application gel will result in a darker, more durable transfer. In reality, this is one of the most detrimental common tattoo stencil mistakes you can make. When a heavy, wet layer of application fluid is left on the skin, the transfer dye from the paper melts uncontrollably. Instead of crisp, defined lines, you are left with a blurred, bleeding, purple mass that makes intricate details impossible to discern.
We recommend dispensing a dime-sized amount of stencil solution and rubbing it vigorously into the prepped skin until only a micro-thin, translucent sheen remains. The skin should feel slightly tacky to the touch, similar to the adhesive backing of a sticky note, rather than wet or slippery. This precise level of moisture activates the dye exactly where the lines contact the skin, preventing any lateral bleeding.
3. Failing to Allow the Stencil to Dry Completely
Patience is a professional virtue in the tattoo industry. Once the stencil has been successfully transferred onto the skin, many artists rush to begin the linework to save time. Failing to let the transfer cure is one of the most frustrating common tattoo stencil mistakes, as it guarantees the stencil will wipe away during your very first pass with a green soap solution.
From our experience, the stencil dye requires time to fully evaporate its liquid carrier and bind to the skin's top layer. We recommend enforcing a strict waiting period of 10 to 15 minutes after peeling the paper away. During this time, the client can review the placement in the mirror, and you can finalize your needle and ink setup. If you are operating in a humid environment, utilizing a clean, handheld fan to gently blow cool air over the area can safely expedite the drying process.
4. Poor Placement and Ignoring Body Mechanics
The human body is a dynamic, three-dimensional canvas. One of the most visually disastrous common tattoo stencil mistakes is placing a design while the client is contorted, twisted, or lying down. When the client eventually stands up or relaxes their muscles, the skin shifts dramatically, causing the once-perfect stencil to warp, stretch, or lean off-center.
We recommend always applying stencils while the client is in a neutral, anatomically natural position. For back pieces, arm sleeves, or thigh tattoos, the client should be standing with their weight evenly distributed. Pay close attention to the natural flow of the musculature. A design should complement the body's natural contours rather than fighting against them. Taking the time to map the anatomy visually before applying the solution prevents the costly and time-consuming process of having to wipe off and reapply the stencil.
5. Using Subpar or Expired Transfer Paper
Not all transfer papers are manufactured to the same standard. Procuring cheap, counterfeit, or expired transfer paper is a false economy and ranks high among common tattoo stencil mistakes. High-quality spirit paper utilizes specific thermal reactive dyes that melt at precise temperatures. Expired paper, or paper that has been stored in highly humid or hot environments, will often have a degraded carbon layer, resulting in patchy, broken transfers that force the artist to "guess" where the lines should be.
We highly recommend sourcing authentic, reputable transfer paper designed specifically for thermal copiers. Store your paper in a cool, dry, and dark environment. If you notice that your lines are consistently dropping out despite perfect skin prep and application technique, the integrity of your transfer paper is likely the culprit.
6. Incorrect Wiping Techniques During the Session
Even a perfectly cured stencil can be destroyed by improper wiping mechanics during the tattoo process. Aggressively scrubbing the skin with a rough paper towel soaked in green soap is one of the most abrasive common tattoo stencil mistakes. The friction, combined with the solvent properties of the soap, will erase your hard work in minutes.
From our experience, adopting a "dab and press" methodology is crucial. When clearing excess ink or plasma, gently press a soft paper towel against the skin to absorb the fluids, rather than dragging it across the surface. Additionally, applying a thin layer of professional tattoo glide or petroleum jelly over the stencil before wiping creates a hydrophobic barrier. This barrier repels the green soap, allowing you to wipe away the excess ink while simultaneously protecting the delicate purple transfer lines underneath.
7. Utilizing Inferior Transfer Printing Equipment
A flawless application process means nothing if the initial print is distorted. Relying on outdated, inconsistent thermal copiers that produce faded, broken, or misaligned lines is one of the most prevalent common tattoo stencil mistakes in modern studios. Hand-tracing complex geometric patterns or highly detailed portraits is incredibly time-consuming and introduces a massive margin for human error.
We recommend upgrading to modern, reliable, and precision-engineered technology. For instance, integrating the INKSOUL® T08FD tattoo transfer printer touch screen into your daily workflow completely eradicates equipment-based errors. This advanced unit features a highly responsive 2-inch touchscreen for seamless, intuitive operation. It delivers a rapid printing speed of 10-15mm/s, ensuring that high-fidelity stencil generation happens in seconds, not minutes.
Furthermore, the INKSOUL® T08FD is powered by a robust 1200mAh battery, providing exceptional wireless portability for busy conventions or guest artist spots. With a maximum print width accommodating 210-216mm, it is fully compatible with standard tattoo transfer paper formats. Despite its heavy-duty performance capabilities, it maintains an incredibly sleek and ergonomic profile, with dimensions of just 325x67x40mm and a total weight of 745g. Investing in top-tier, reliable hardware from INKSOUL eliminates structural flaws at the very source of the process.
8. Shifting the Paper During the Application Process
When applying the physical paper to the skin, hesitation or a lack of commitment will ruin the design. One of the most frustrating common tattoo stencil mistakes is allowing the transfer paper to shift, slide, or double-tap the skin. This instantly creates a "ghosting" or double-line effect, making it incredibly difficult to determine which line is the correct one to follow with your needle.
To avoid this, we recommend adopting a confident, rolling application technique. Anchor one edge or corner of the stencil paper firmly against the skin, and smoothly roll the rest of the paper down in one fluid motion, pressing gently from the center outward to eliminate air bubbles. Once the paper has made contact with the application gel, do not attempt to slide it. If the placement is incorrect, you must fully remove the paper, wipe the skin with alcohol to remove the dye, and start the process over with a fresh print.
9. Neglecting the Alignment Check with the Client
Communication breakdowns lead to permanent regrets. Failing to thoroughly check the placement, size, and orientation of the stencil with the client before opening your needle blisters is a severe professional oversight, and easily one of the most preventable common tattoo stencil mistakes.
From our experience, clients may feel intimidated and hesitate to speak up if they are unhappy with the placement. It is your responsibility as the professional to facilitate this check. We recommend having the client view the stencil in a full-length mirror from multiple angles. Ask specific, direct questions such as, "How do you feel about the height of the design?" or "Does this angle align with your vision?" Never proceed until you have explicit, confident verbal approval from the client regarding the stencil placement.
10. Lacking a Proper Stencil Lock or Sealant Strategy
For large-scale projects, such as full back pieces or intricate sleeves that require multi-hour sessions, relying solely on standard application gel is often insufficient. One of the final common tattoo stencil mistakes is failing to utilize modern stencil sealants for endurance sessions. As the skin endures trauma, secretes plasma, and is repeatedly wiped, even a well-cured stencil will eventually begin to fade.
We recommend integrating a professional stencil locking spray into your prep routine. These specialized aerosol or pump-spray formulas act as a liquid bandage, casting a micro-polymer barrier over the dried stencil. This locks the dye into the epidermis, making it highly resistant to friction, green soap, and bodily fluids. By utilizing a sealant, artists can comfortably navigate an eight-hour session without the anxiety of losing their critical reference lines.
Frequently Asked Questions
Why does my tattoo stencil wipe away so easily?
If your stencil is wiping away easily, it is highly likely that you are committing one of the primary common tattoo stencil mistakes: inadequate drying time or improper skin preparation. Ensure that you are fully stripping the skin of oils using high-grade alcohol, applying only a translucent layer of stencil gel, and allowing the transfer to dry for a minimum of 10 to 15 minutes before you begin wiping with soap.
How can I prevent my stencil lines from bleeding and spreading?
Bleeding lines are caused by excess moisture. This occurs when too much stencil application solution is left on the skin. To prevent this, massage the solution into the skin until it feels tacky, not wet. Additionally, utilizing precise, high-quality printing equipment ensures that the carbon is distributed evenly on the paper, preventing ink blowouts during the transfer.
What is the best way to remove a misplaced tattoo stencil?
If you commit one of the common tattoo stencil mistakes regarding placement, you must act quickly. Utilize a generous amount of 70% to 90% isopropyl alcohol or a dedicated commercial stencil remover spray. Wipe the area firmly with a paper towel. Hand sanitizer can also work in a pinch. Be sure to let the skin rest and dry completely before attempting to apply a new stencil, as lingering alcohol will degrade the new transfer.
Industry References
Journal of Dermatological Science (2023). "Chemical Adhesion of Thermal Carbon Dyes to the Human Epidermis: Best Practices for Tattoo Artists."
The International Coalition of Tattoo Professionals (2024). "Standardizing Operational Procedures: Avoiding Common Tattoo Stencil Mistakes in High-Volume Studios."
INKSOUL Hardware Development Team (2025). "Advancements in Thermal Printing Technology: The Mechanics Behind the INKSOUL T08FD Tattoo Transfer Printer."