
Noticias
freehand stencil
How to Draw on Tattoo Transfer Paper
Yes — you can draw directly on tattoo transfer paper with a ballpoint pen or a stylus, no printer needed. Draw on the top sheet with firm, even pressure and the carbon layer underneath copies every line onto the sheet that touches the skin.
Hand drawing is the fastest way to make a one-off stencil — a walk-in flash piece, a freehand adjustment, a design that only exists in your head. It is also the slowest way to make a complicated one. This guide covers the paper, the pen, the pressure, and when to stop drawing and print instead.
What you are actually drawing on
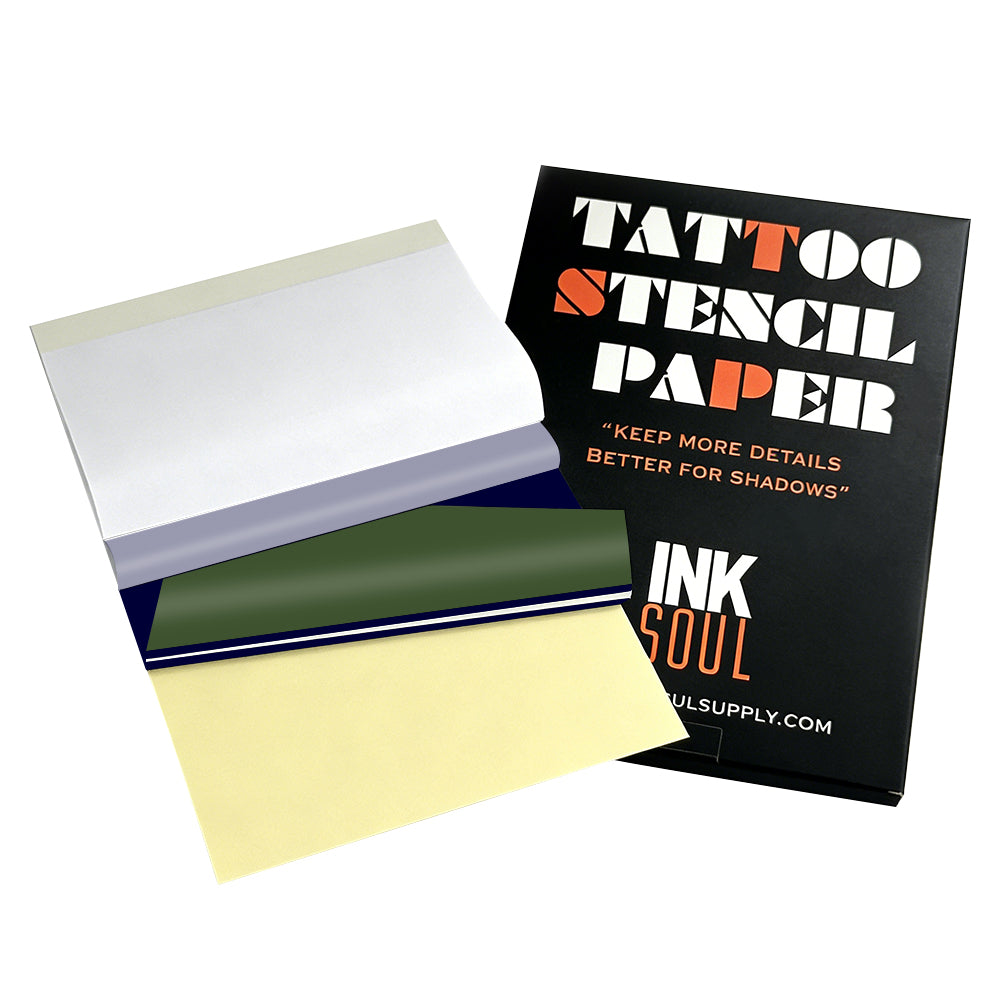
A sheet of tattoo transfer paper is a stack, and each layer has one job:
Top sheet (master sheet): the white sheet you draw on. Your pen never touches anything else.
Carbon layer: the purple or blue sheet in the middle. Your pen's pressure pushes its pigment onto the back of the top sheet — that back becomes the stencil.
Protective tissue (onion sheet): a thin separator that keeps the carbon from marking the top sheet in storage. Remove it for the darkest transfer (see step 2).
Backing sheet: the bottom layer. Leave it in place — it keeps the stack aligned and the carbon off your desk.
Two types of paper take hand drawing. Freehand (hectograph) paper is made for it: its carbon layer is pressure-activated and forgiving of uneven strokes. Thermal paper is made for heat. It also takes a pen, but the lines come out lighter and less consistent — its carbon layer is tuned for the printhead, not your hand. Use a stylus and firm pressure. For printed work the paper choice matters more: our SP100 is made for shadow work and the LP100 for line work, both $38.88 for 100 A4 sheets.
The right pen (and the wrong ones)
The pen is not leaving ink on the paper — it is pressing pigment through three layers. What works:
Medium-tip ballpoint pen: the studio standard. A firm, round tip presses evenly without cutting the top sheet. This is the tool to reach for first.
Stylus or hectograph pencil: purpose-built for this job. A stylus gives the most consistent line weight over a long session — the tip never goes soft or scratchy.
Fine-tip ballpoint: good for detail and lettering, but keep pressure light — a sharp tip tears the top sheet faster than a medium one.
What does not work: a soft graphite pencil (6B and softer). Graphite smears under your palm, and a soft lead cannot press the carbon evenly — grey smudge on top, faint broken line underneath. The final pass on transfer paper should always be pen or stylus.
How to draw on tattoo transfer paper: step by step
1. Set up a hard, flat surface
Carbon transfer needs resistance underneath. A clipboard or a hard table works. A soft surface — a sketchbook, a bed, your thigh — absorbs the pressure and your lines come out uneven. Tape the top corners down so it cannot shift mid-drawing.
2. Remove the tissue layer
Peel out the thin protective tissue between the top sheet and the carbon for the darkest transfer. Drawing through it still works, but the lines come out lighter — some artists keep it in while sketching, then remove it for the final pass. Keep the backing sheet underneath.
3. Draw on the top sheet, in one confident pass
Draw the design on the top white sheet, as you want it on the skin. Use smooth strokes and steady, even pressure — not a death grip. Work top to bottom (left to right if you are left-handed) so your palm never rests on lines already drawn; hand oils and friction smear fresh carbon.
4. Check the transfer before you commit
Halfway through, lift a corner and check the underside: lines should be solid purple and continuous. Faint or broken lines mean too light; a torn top sheet means too hard. Adjust now, while you can still redraw.
5. Trim close to the lines
Cut close to the design, leaving a small margin. Less loose paper means less chance of shifting or creasing when you press it to skin, and easier positioning on curved areas like ribs or forearms. Store finished stencils flat with the tissue slipped back in — heat and pressure in a bag smudge the carbon.
6. Prep the skin, then apply
Shave if needed, wash with antibacterial soap, wipe with alcohol, then apply a thin, even layer of stencil gel. Wait until it turns tacky — about 30 seconds to a minute — then place the stencil face down and press firmly for 30 to 60 seconds without sliding it. Peel from one corner. If a line looks weak, do not press the paper back down — it will double-print. Redraw instead. If the whole placement is wrong, wipe it off with green soap and water and start over — never tattoo over a stencil you cannot trust.
7. Let it dry before you tattoo
Give the stencil 5 to 15 minutes to dry fully — starting too soon turns a crisp stencil into a smudge halfway through the outline. For the full routine, see our guide on using stencil gel so the transfer stays sharp all session.
Do you need to draw it backwards?
No — the image flips twice. Your pen presses the carbon onto the back of the top sheet, which mirrors the drawing — then that back goes face down on the skin, which mirrors it again. The stencil lands the right way round. Draw normally, exactly as you want it to look.
The same applies when tracing a printed reference: trace what you see. A printed design that looks reversed is a printer problem, not a drawing problem — see which side of transfer paper faces up.
Pressure and line weight: the part that separates clean stencils from muddy ones
Hand-drawn lines come out on skin slightly heavier than they look on paper — the carbon spreads a fraction under pressure and the gel softens the edge. Two adjustments fix most muddy stencils:
Draw fine lines thinner than the final tattoo line. If the tattoo needs a 0.35 mm line, draw it like a 0.25 mm line — the transfer fattens it for you. Draw at full weight and the stencil looks bold before the needle touches skin.
Keep pressure even, not hard. Past a point, pressing harder does not darken the stencil — it tears the top sheet and embosses a trench that prints as a thick, blurred line. If lines are faint, make a second slow pass over the same stroke.
Shading is the hard limit of hand drawing: you cannot print grey wash with a pen. Map shadow areas as boundary lines and shade freehand with the machine. If the design lives or dies on smooth gradients, that is a printing job.
Hand-drawn vs printed: when to put the pen down
Hand-drawn on transfer paper
Printed (thermal stencil printer)
Best for
One-off designs, walk-in flash, freehand adjustments
Repeat designs, large pieces, fine-line detail
Speed
Minutes for simple designs; hours for complex ones
Seconds per sheet once the file is ready
Line consistency
Depends on your hand that day
Identical every time
Shading
Boundary lines only — shade with the machine
Prints shadow gradients (SP100 paper)
Gear needed
Paper + a ballpoint pen
Printer + paper + phone app
When you are redrawing the same design for the third time, printing starts paying for itself. Our pick is the INKSOUL T08FD ($188.88): its touchscreen lets you preview and size the design before it prints — the second look hand drawing cannot give you. The T08FS ($168.88) is the classic wireless model if you print from your phone. The transfer workflow bundle ($288.88) pairs the T08FD with LP100 and SP100 paper plus stencil gel. Our full comparison is in the best tattoo stencil printer for professional use.
5 mistakes that ruin a hand-drawn stencil
Mistake
What happens
Fix
Drawing through the tissue layer
Lighter lines than a direct pass
Remove the tissue for the final pass; keep it in only while sketching
Soft pencil instead of ballpoint
Grey smudge on top, broken line underneath
Sketch in pencil on scrap; final pass in pen or stylus
Resting your palm on drawn lines
Hand oils and friction smear the carbon
Work top to bottom; keep the drawing hand floating
Re-pressing a weak line
Double-printed ghost lines
Never re-press; redraw a fresh stencil
Trying to erase a wrong line
Correction fluid and alcohol smear the carbon
Start a fresh sheet; keep the spoiled one for practice
Tattooing before the stencil dries
Lines smudge under the first wipe
Wait 5–15 minutes; test with a light touch first
FAQ
Can you draw on thermal transfer paper by hand?
Yes, but not as well as on freehand paper. Thermal paper's carbon layer is thinner and tuned for heat, so hand-drawn lines come out lighter and less consistent — use a stylus and firm pressure. Freehand (hectograph) paper is the better choice if you are buying paper to draw on: its carbon is made for pressure transfer and more forgiving of uneven strokes.
What pen do you use to draw on tattoo transfer paper?
A medium-tip ballpoint pen is the studio standard: firm, even pressure without tearing the top sheet. A stylus or hectograph pencil works just as well and holds line weight better over a long session. Avoid soft graphite pencils — they smear and cannot press carbon evenly.
Do you draw on the carbon side or the white side?
Draw on the white top sheet, never directly on the carbon. Your pen's pressure pushes the carbon pigment onto the back of the top sheet, and that back is what transfers to the skin. Remove the protective tissue first; leave the backing sheet in place.
Why is my hand-drawn stencil too faint?
Usually one of three things: you drew through the tissue layer, the pressure was too light, or the paper sat on a soft surface that absorbed the force. Check by lifting a corner mid-drawing — the underside should show solid, continuous purple lines. If lines are broken, slow down and make a second pass over the same stroke instead of pressing harder.
Is it better to draw a stencil by hand or print it?
For a one-off design or a freehand adjustment, drawing is faster — paper and a pen, no file prep. For anything you will repeat, anything large, or anything with fine-line detail or smooth shading, print it: a thermal printer reproduces the same lines every time, and the T08FD's screen lets you check size and placement first.
stencil paper
Which Side of Tattoo Transfer Paper Faces Up?
Direct answer
Load the sheet so the blue carbon layer faces the printer's thermal head. On the top-loading thermal printers most studios use, that means blue side up, with the thin protective tissue removed before printing. Tear direction — top-down versus bottom-up — does not change how dark the stencil prints. If a reel shows one tear direction printing deep and the other printing faint, something else changed: the sheet was loaded the wrong way round, the tissue was still in place, or the darkness setting was different.
That distinction matters because a recent round of reels teaches a "correct direction to tear the paper," with one direction marked wrong and the other right. We taught the other version back in August: it is not about which way you tear. It is about which side faces the head.
The four layers, and which one does the work
A sheet of thermal transfer paper is not one sheet. It is a sandwich, and every layer has a job:
White master sheet — the sheet that carries the printed design to the skin.
Protective tissue — a thin, translucent sheet between the master sheet and the dye layer. It protects the pack in transit and must come out before printing.
Blue/purple carbon (dye) layer — the layer the thermal head heats. Heat activates the dye and bonds the line work onto the master sheet.
Stiff backing sheet — the yellow-backed support sheet that keeps the set flat and feeding straight.
The thermal head can only activate dye it can heat. Load the set backwards and the head fires at the backing sheet instead of the dye layer. The printer feeds normally, sounds normal, and produces nothing useful — or a ghost so pale you assume the printer is dying. It is not dying. It is heating the wrong side of the sandwich.
Before loading, peel one corner back and name the layers: white, tissue, blue, backing. If you cannot tell which is which on a new brand, print a 2–3 cm test strip before committing a full sheet.
Why "blue side up" is the rule — and when it is not
"Blue side up" is the working rule for a top-loading thermal printer, because on that feed path "up" is the side the thermal head meets. The invariant rule underneath it is dye layer toward the head. That is why you will occasionally see a manual for a different feed path show the carbon facing down: the head is underneath on that machine, so "down" is still "toward the head."
So the checklist is not "always up." It is:
Find your printer's feed diagram and confirm which side meets the head.
Load the dye layer on that side.
If the diagram is missing or ambiguous, run the test strip both ways and keep the one that prints solid.
Do not let a reel override your printer's diagram. Two artists can follow the same reel, tear the same way, and get different results — because one loaded dye-to-head and the other did not. The tear got the blame; the loading deserved it.
Tear direction: what it actually affects
Peeling the master sheet off the carbon layer after printing is a handling step, not a printing step. By the time you peel, the dye has either transferred or it has not. Peeling slowly and steadily, without yanking or dragging the sheet sideways, protects lines that are still slightly tacky. Peeling fast, at a sharp angle, can smudge a good print.
What peeling does not do is add dye. A faint stencil peeled "correctly" stays faint. A deep stencil peeled casually does not become faint — it may smudge at an edge, which is a different failure, and one you can see as a smear rather than as uniform paleness. If your whole stencil is pale, look at loading, tissue, and darkness first. Those are the three causes that change density across the entire design. Peeling only ever changes part of it.
The same logic applies on skin: the printed sheet goes face-down onto a thin, tacky layer of transfer gel, you press evenly without sliding, and you lift in one smooth motion. Lifting direction does not deepen the transfer; even pressure and a tacky — not wet — gel layer do. Too much gel and lines bleed; too little and the stencil lifts patchy. Once it is on, do not wipe it with green soap until the outline is in — dry-wipe or lubricant-wipe only — or soap and sweat will lift it mid-session.
Hand-drawn stencils follow the same physics, in reverse order
It is worth separating the two workflows, because they are where the confusion usually starts. When you draw a stencil by hand, you draw on the matte white top sheet, pressing through to the carbon layer underneath. The carbon is below your pen, and that is correct for hand work — pressure, not heat, is doing the transfer.
A thermal printer reverses the energy source. Heat comes from the head, so the dye layer must face the head. Artists who learned on hand-drawn stencils sometimes load a thermal set the same way — white on top, carbon underneath — and then wonder why the print is faint. The sheet order did not change; the direction the energy comes from did.
Roll paper adds one more trap: a roll looks the same from either end, so it is easy to thread neatly and backwards. Confirm the feed direction on the first length with a test print, then mark the roll's outer feed side so you do not have to guess again.
When orientation is right and the stencil still fails
Orientation is the first check, not the only check. If a correctly loaded test strip still prints pale, change one variable at a time: raise darkness one step and retest; clean a dirty head (power off, unplug, cool, then wipe in one direction with a lint-free swab dampened with isopropyl alcohol at no stronger than 70%, and let it dry fully); print on a full charge; store opened packs flat, cool, and sealed, since heat and damp age the dye layer; and re-export grey or photo-style files as pure black-and-white, because a thermal head treats grey as partial heat — modern printers render it by dithering, so gradients break into dots. A cheap printer loaded correctly will out-print an expensive printer loaded backwards, every time.
The 60-second check before every print
Work this order and you will almost never waste a sheet:
Peel a corner and identify the four layers. Remove the protective tissue.
Load dye layer toward the thermal head — blue side up on a top-loading machine.
Confirm the design is pure black-and-white at 100% scale, with no grey fills. A thermal head treats grey as partial heat, so grey comes out as broken speckles.
Print a 2–3 cm test strip. Check fine lines first: thin strokes carry less dye per millimetre than bold ones, so fine-line work is where a wrong loading shows up first.
Only then print the full design. If the test strip is pale, raise the darkness setting one step and retest — do not change three variables at once.
Correct vs. reversed vs. the myths, side by side
Situation
What you get
What to fix
Dye layer toward the head, tissue removed
Solid lines, fine detail holds
Nothing — print the full design
Sheet loaded backwards
Ghost print or blank sheet, printer sounds normal
Flip the set so the dye layer faces the head
Protective tissue left in place
Uniformly pale, washed-out stencil
Peel the tissue out before printing
Torn "the wrong way" but loaded correctly
Normal stencil; possible edge smudge if yanked
Peel steadily; do not reprint for tear direction alone
What to buy once, so this stops being a recurring problem
Keep one paper you know as your house stock, and learn its corner-peel test once. Switching brands mid-week means relearning which layer is which under time pressure.
Our Pick is the INKSOUL T08FD: a touch-screen machine with an INKSOUL-exclusive colourway and a failure rate far below the older model, printing from a phone app. The T08FS remains the classic option in the same workflow.
Match the sheet to the work: line paper for crisp line work, shadow paper for heavy blackwork, and a 210mm x 30m roll for large pieces, cut to length instead of taping sheets together. If you switch paper brands, re-run the test strip and darkness check first — sensitivity varies by paper, so a setting that was right for one brand is not automatically right for the next. Gel is not an afterthought here either: a tacky gel layer holds transferred dye, while an alcohol-wet surface lets it slide, so the gel choice interacts directly with how dense the stencil looks on skin.
Our Pick printer: INKSOUL T08FD
Classic printer: INKSOUL T08FS
Shadow stencil paper: Shadow stencil paper
Stencil paper roll 210mm x 30m: Stencil paper roll 210mm x 30m
Transfer gel: Transfer gel
Related troubleshooting: faint-stencil checklist, dark-transfer fix, smudge guide.
FAQ
Which side of tattoo transfer paper faces up in a thermal printer?
The blue carbon (dye) side faces the thermal head. On a top-loading printer that means blue side up, with the protective tissue removed. On a machine whose head sits underneath, the same rule means dye side down — dye toward the head is the rule, up is just the common case.
Does tear direction change how dark a stencil prints?
No. Tear or peel direction affects smudging at the edges if you yank the sheet, but it does not add or remove dye. A uniformly faint stencil is a loading, tissue, darkness, or source-file problem, not a peeling problem.
What happens if I load transfer paper backwards?
The thermal head heats the backing sheet instead of the dye layer, so you get a ghost print or a blank sheet while the printer feeds normally. Flip the set so the dye layer faces the head and reprint a test strip.
Should I remove the thin tissue sheet before printing?
Yes. The translucent protective tissue sits between the master sheet and the dye layer to protect the pack, and it blocks heat if left in place. Peel it out before loading; printing through it is the most common rookie cause of a faint stencil.
Why is my stencil pale even though the paper is loaded correctly?
Check darkness one step at a time, then the source file: grey fills and photo textures print as broken speckles because a thermal head treats grey as partial heat. Re-export as pure black-and-white.
A4 tattoo stencil paper
¿Debo comprar papel para plantillas de tatuajes en rollos o en hojas?
Respuesta corta: Compra el rollo si imprimes diseños grandes o gastas papel rápido — un rollo de 210mm × 30m dura más que una caja de hojas A4 y nunca te obliga a recortar papel para que quepa en tu impresora. Compra hojas A4 si sobre todo imprimes plantillas de tamaño estándar y quieres simplicidad de coger e imprimir. Pero el formato es la decisión menor. La consistencia del papel y el almacenamiento son lo que realmente decide si tu plantilla sale nítida.
Lo que un rollo realmente cambia en tu flujo de trabajo
El papel de plantilla térmico viene en capas: una hoja maestra, un tejido protector, la capa de carbono entintada y una hoja de respaldo. Rollo u hoja no cambia esa química — cambia cómo el papel alimenta tu impresora. Un rollo de 210mm × 30m es una alimentación continua, y la diferencia práctica aparece en tres momentos:
1. Las piezas grandes dejan de ser un problema de papel. Una manga completa o una pieza de espalda no cabe en una hoja A4. Con hojas pegas varias impresiones y esperas que las uniones no se muevan. Con un rollo, imprimes el diseño a longitud completa en una pasada — sin uniones, sin dolor de cabeza de alineación.
2. Sin recortar para que quepa en la impresora. Este es el detalle que la gente aprende por las malas: no todos los anchos de hoja coinciden con el camino del papel de cada impresora. Compra un tamaño de hoja no estándar y recortarás antes de cada impresión — un impuesto diario en días ocupados. Quédate con hojas A4/Carta estándar y este problema nunca aparece. Un rollo de 210mm alimenta directamente los caminos de papel de la INKSOUL T08FD y T08FS (ambos modelos admiten impresión en rollo), así que la pregunta "¿esto cabe?" desaparece.
3. Un rollo reemplaza mucho inventario. Un solo rollo contiene 30 metros continuos. Para tiendas de alto volumen que imprimen docenas de plantillas a la semana, una caja en el estante cubre muchas más sesiones de lo que parece — menos reordenes, menos espacio en estante.
La contrapartida: un rollo necesita un lugar donde vivir y unas tijeras cerca. Lo alimentas, imprimes y luego cortas la plantilla impresa. Es un movimiento de mano extra por impresión — trivial en un estudio, ligeramente molesto en una configuración apretada de guest spot. Otro hábito específico del rollo: el papel en rollo recién cortado tiene memoria de curvatura y quiere volver a su forma. Aplánalo bajo un libro un minuto o alísalo sobre la piel desde el centro hacia afuera, o el borde curvado puede levantarse a mitad de la transferencia y fantasmar tu plantilla.
Lo que las hojas A4 hacen mejor
Las hojas ganan en conveniencia, no en economía:
1. Cero configuración por impresión. Abre la caja, toma una hoja, imprime. Sin alimentar, sin cortar, sin medir. En un día con ocho clientes, ese ritmo importa.
2. Coste fijo y predecible. 100 hojas son 100 impresiones — puedes contar tu coste exacto de papel por sesión. Los rollos te obligan a estimar a ojo cuánta longitud consumió cada impresión.
3. Las formulaciones están etiquetadas por trabajo. Esta es la parte que realmente mueve la aguja en la calidad de transferencia: no todo el papel A4 es la misma receta. Nuestro LP100 está ajustado para linework nítido, la línea SP100 para rellenos de sombra suaves — eliges la caja según lo que imprimas ese día en lugar de hacer todo en un rollo.
Cara a cara: la comparación real
Lo que importa
Rollo (210mm × 30m)
Hojas A4 (paquete de 100)
Ideal para
Mangas, piezas de espalda, alto volumen
Plantillas de tamaño estándar, flujo diario constante
Preparación de impresión
Alimentar + cortar tras imprimir
Ninguna — coger e imprimir
Seguimiento de costes
Por metro (depende del tamaño del diseño)
Por hoja (fijo)
Almacenamiento
Un rollo voluminoso, sellado hasta su uso
Caja de hojas — mantén la caja cerrada
Ajuste a la impresora
210mm coincide con el camino de papel de T08FD/T08FS
Debe coincidir con el ancho de tu impresora o recortas
Desperdicio
Casi ninguno — corta exactamente lo que imprimes
Retales de cada recorte sobredimensionado
Las cinco cosas que importan más que rollo vs. hoja
Pregunta esto antes de pagar — compres el formato que compres:
1. Consistencia de lote. La queja más común en el mundo real sobre el papel de plantilla barato no es el formato — es que las impresiones de la misma caja salen con diferente oscuridad, algunas pálidas incluso con ajustes de densidad altos. El papel que transfiere de forma desigual desperdicia tu tiempo y la paciencia de tu cliente. Esto es una cuestión de calidad de fabricación, no de formato.
2. Empaque sellado y a prueba de luz. Los enemigos del papel térmico son el aire y la luz. Las cajas que llegan con envoltura suelta y sin sellar tienden a imprimir pálido y desigual — el papel ya ha empezado a degradarse antes de que lo toques. Nuestro LP100 y SP100 se envían en empaque sellado y a prueba de luz precisamente porque la humedad y la exposición a la luz es lo que convierte el buen papel en impresiones pálidas.
3. El ancho correcto para tu impresora. Mide el camino del papel de tu impresora antes de pedir. Un rollo de 210mm alimenta nuestras impresoras T08FD y T08FS directamente sin recortar; una hoja A4 cabe en cualquier impresora con camino A4. Un ancho incorrecto significa un impuesto de tijeras en cada impresión.
4. Formulación de línea vs. de sombra. El linework necesita un papel que deposite pigmento denso y nítido para que las líneas finas sigan visibles tras la transferencia. El trabajo de sombra necesita uno que deposite un tono suave y uniforme. Si imprimes ambos, tener ambas formulaciones supera a buscar un papel de compromiso.
5. Almacenamiento tras abrir. Una vez abierto, mantén el papel seco, oscuro y sellado. Una caja dejada abierta en un estante húmedo del estudio durante un mes imprime como un producto diferente y peor — y la mayoría de los artistas culpan primero a la impresora.
El veredicto: decide por escenario
Estudio de alto volumen o trabajo personalizado grande → el rollo. Rollo de papel de plantilla para tatuajes INKSOUL 210mm × 30m — alimentación continua, sin recortar para que quepa, 30 metros por rollo ($42.88 por una caja, $152.88 por cuatro).
Linework constante, tamaños estándar → hojas A4. Papel de plantilla LP100 A4, 100 hojas (mejor para línea — $38.88 por una caja, $138.88 por cuatro), o la línea SP100 para trabajo de sombra. Coger e imprimir, empaque sellado a prueba de luz.
Las transferencias siguen saliendo pálidas pase lo que pase → arregla primero la calidad y el almacenamiento del papel. El formato no salvará un lote que ya estaba degradado. Compra papel sellado de una fuente consistente, guárdalo oscuro y seco, y vuelve a probar antes de culpar a tu impresora.
Combínalo con la impresora adecuada. El papel solo transfiere tan bien como la impresora lo deposita. Tanto la T08FD como la T08FS manejan hojas A4 y rollos de 210mm. La T08FD es nuestra elección: pantalla táctil, colores exclusivos de INKSOUL y una tasa de fallos mucho menor.
Preguntas frecuentes
¿El papel de plantilla para tatuajes caduca?No tiene fecha de caducidad impresa, pero el papel térmico se degrada con la exposición al aire, la luz y la humedad. Sellado, guardado oscuro y seco, se mantiene fiable durante mucho tiempo. Una caja abierta dejada en un estante húmedo imprime pálido en semanas — eso es degradación, no caducidad.
¿Mi impresora T08FD puede usar un rollo de 210mm directamente?Sí. Tanto la T08FD como la T08FS admiten impresión en rollo, y un rollo de 210mm alimenta sus caminos de papel sin recortar.
¿Un rollo es realmente más barato que las hojas?Por metro de papel, en realidad no — 100 hojas A4 (≈29.7m) a $38.88 superan al rollo de 30m a $42.88 en precio unitario. Donde el rollo gana es en desperdicio: para diseños pequeños cortas exactamente los 10cm que necesitas en lugar de tirar la mayor parte de una hoja A4. Las tiendas de alto volumen que imprimen plantillas pequeñas todo el día ahorran en rendimiento, no en precio del papel. Por sesión, las hojas son más fáciles de presupuestar porque cada hoja es un coste fijo. Las tiendas de gran volumen ahorran con rollos; los usuarios ligeros empatan en conveniencia.
¿Cuál es la diferencia entre el papel de línea y el de sombra?El papel de línea (como el LP100) está formulado para depositar pigmento denso y nítido para que los contornos finos sigan visibles tras la transferencia. El papel de sombra (como el SP100) deposita un tono más suave y uniforme para sombreado. Ajustar la formulación al trabajo da transferencias visiblemente mejores que hacer todo con un solo tipo.
Mi plantilla sale demasiado pálida incluso a densidad máxima — ¿es la impresora?Revisa primero el papel. Las impresiones pálidas con ajustes de densidad altos son el síntoma clásico de papel degradado o inconsistente — exposición a la humedad, empaque suelto o un lote débil. Prueba con una hoja fresca y sellada y compara antes de tocar los ajustes de la impresora.